Managing Files
If you are a Creator or Admin, you can manage files in the workspace on the Canvas Envision Portal with the sidebar, content toolbar, and action menu. Some features are available at multiple places. You can apply some features to multiple files. Some features and procedures are the same for files, shortcuts, and folders.
Supported file types
The Canvas Envision Portal supports only Envision documents, which are the files of the evdoc type. This file type is native to the Canvas Envision Portal, Canvas Envision Creator, and Canvas Envision Web Viewer.
The subject of this documentation is working with the native Envision documents: evdoc files. Thus, files and Envision documents are synonyms in the given context.
File statuses
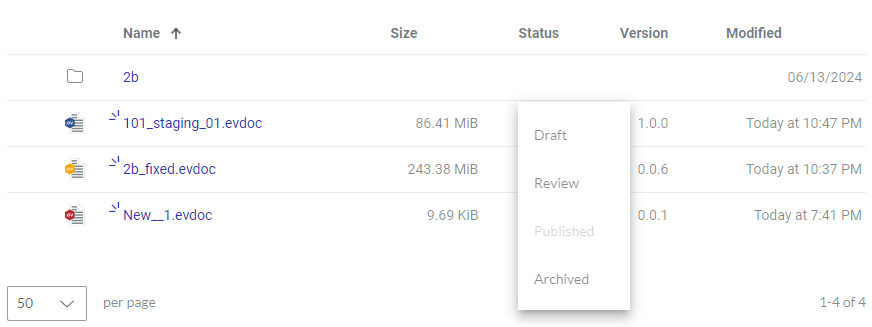
The Status content table column displays the current statuses of the documents:
Draft
Review
Published
Archived
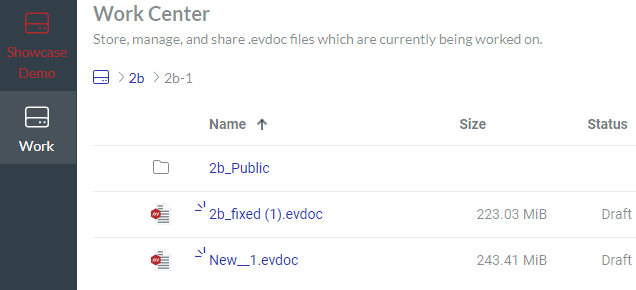
Draft is the initial document status. Once you submit the document for review, its status is automatically set to Review. Once you publish it, its status becomes Published. Being a Creator or Admin, you can change the document status manually by selecting it from the drop-down list in the Status column.
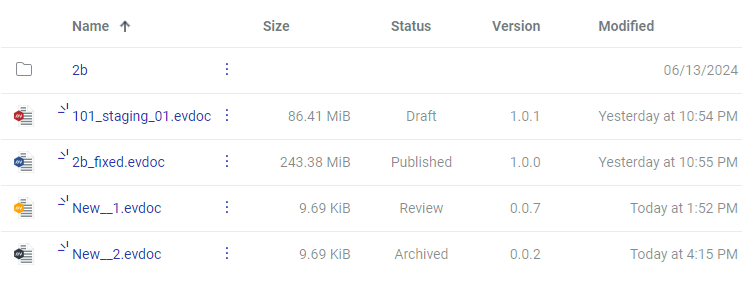
The color of the hexagon background in the file icon reflects the file status as follows:
Red: Draft
Yellow: Review
Blue: Published
Black: Archived
Action menu for files
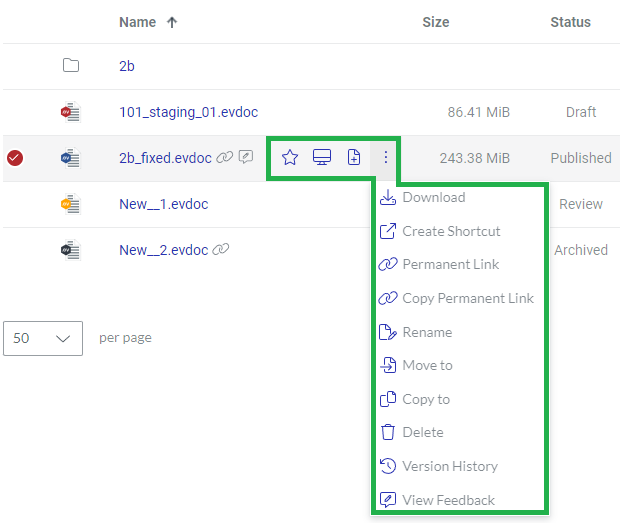
For a given Envision document, the action menu features the following options:
Favorite: to add or remove the document from Favorites. It is filled with blue for documents in Favorites.
Edit: to open the latest (current) version of the document in the Canvas Envision Creator app for editing.
View: to open the latest version of the document in the Canvas Envision Web Viewer for viewing as an end document user.
Open as Template: to create a new document in the Canvas Envision Creator using the latest version of the given document as a template.
Download: to download the latest version of the document from the Portal to the local machine as an evdoc file.
Unlock: to unlock the document when it is opened for editing somewhere. This button is visible only for documents opened in the Canvas Envision Creator and active only for Admins.
Create Shortcut: to create a view-only internal link to the document within the workspace.
Permanent Link: to create a view-only external link to a published document version. This button is visible only for documents that have a version with the Published status.
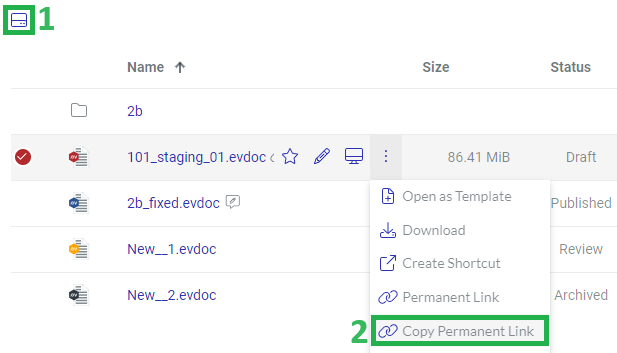
Copy Permanent Link: to copy a view-only external link to a published document version to the clipboard. This button is visible only for documents with permanent links.
Rename: to give the document another name.
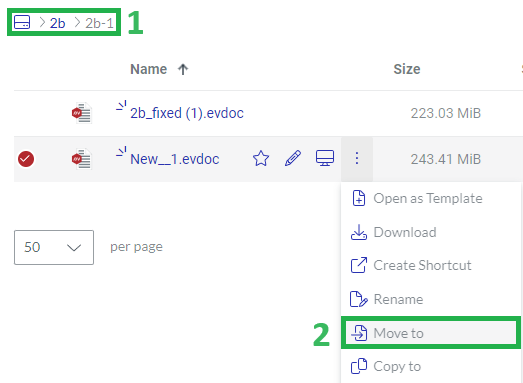
Move to: to move the document with all its versions to another folder or work center.
Copy to: to create a copy of the latest version of the document within the workspace.
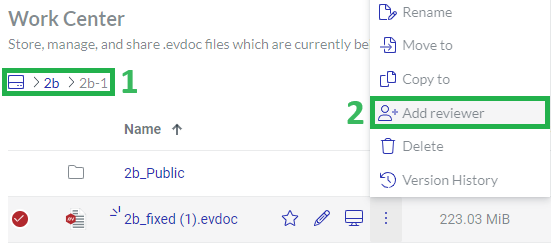
Add reviewer: to submit the latest version of the document for review.
Delete: to remove the document with all its versions from the workspace.
Version History: to view the document versions and their history.
View Feedback: to view feedback on the published document in the Canvas Envision Web Viewer. This button is visible only for documents with feedback and the Published status.
Creating files
To create a new Envision document in the workspace on the Envision Portal:
Go to the work center and folder where the document should be.
On the sidebar, click the Create button.
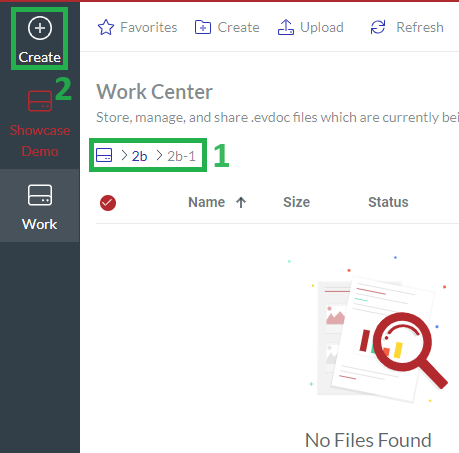
The system opens the Canvas Envision Creator application in the same browser tab.
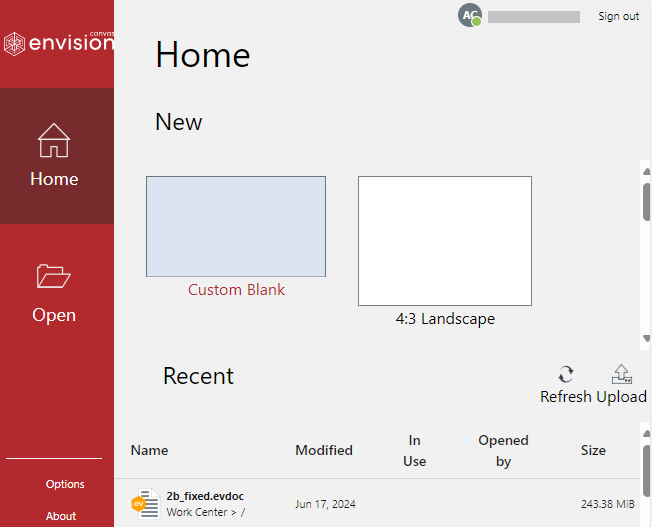
Continue creating the document with the Canvas Envision Creator application.
Video tutorial on file creation
Uploading files
To upload an existing Envision document from your local machine to the Envision Portal:
Go to the work center and folder where the document should be uploaded.
On the content toolbar, click the Upload button.
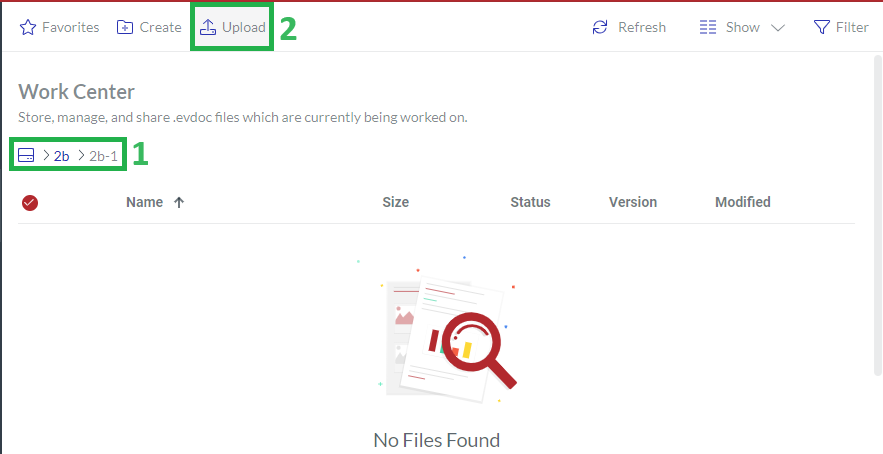
The system opens the browser dialog for uploading files.
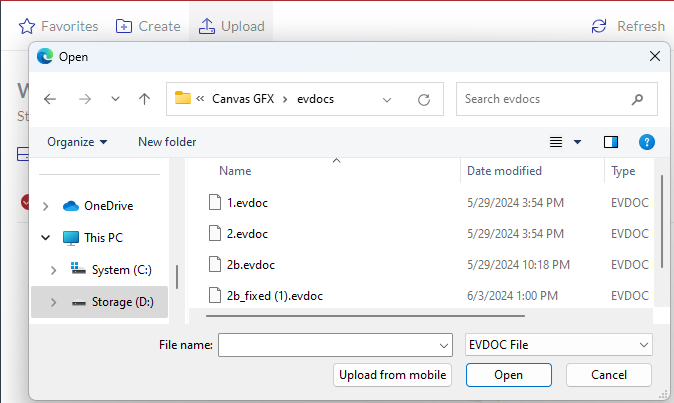
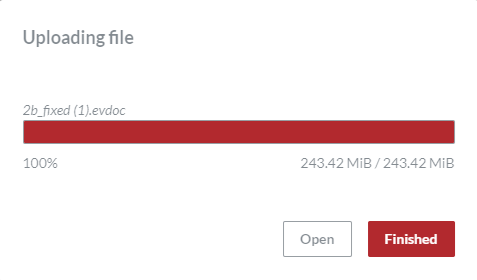
In the browser dialog, search for and select the document and click Open. The Uploading file dialog pops up and displays the progress.
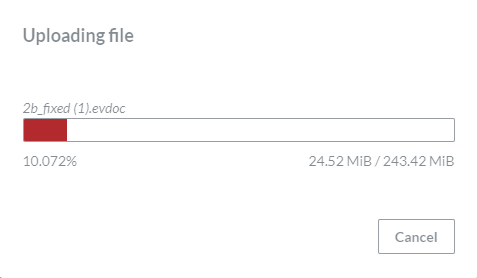
Once uploading is completed, click either:
Open to open the uploaded document in the Canvas Envision Creator in the new browser tab.
Finished to return to the content table.
Video tutorial on file uploading
Opening files for editing
To open an Envision document from the Portal for editing in the Canvas Envision Creator:
Go to the document you want to edit in the Canvas Envision Creator.
Either:
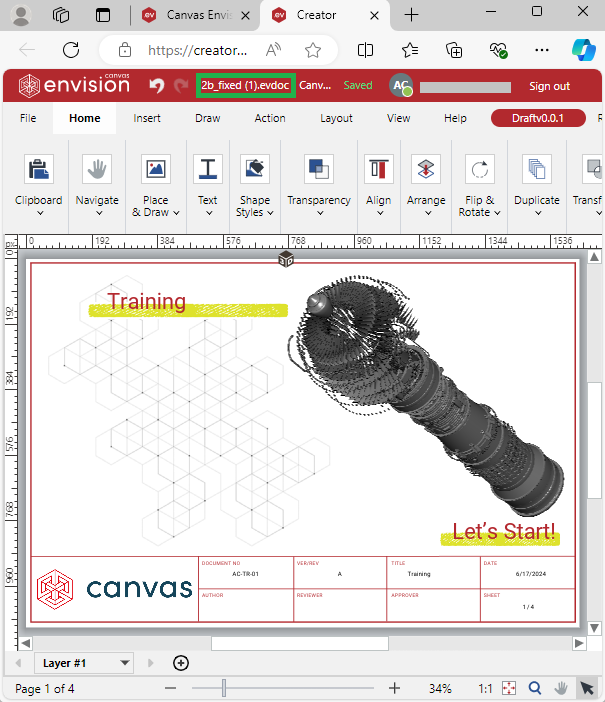
Click the filename of the document in the content table row.
Click the Edit button from the file action menu.

The system opens the document in the Canvas Envision Creator in another browser tab.
Opening files for viewing
To open an Envision document from the Portal in the Canvas Envision Viewer:
Go to the document you want to view in the Canvas Envision Viewer.
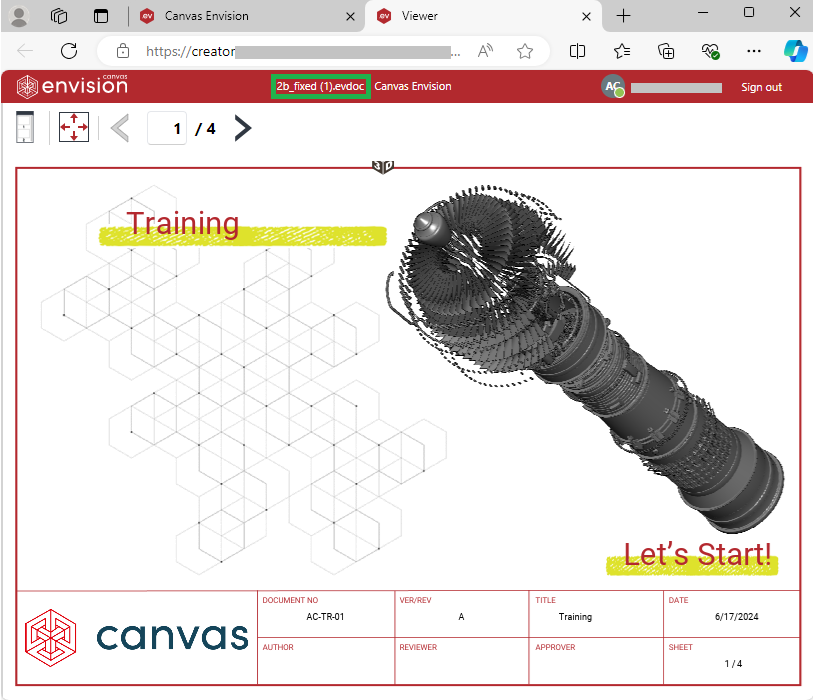
Click the View button from the file action menu.

The system opens the document in the Canvas Envision Creator Viewer in another browser tab.
Using files as templates
To create a new Envision document from the latest version of a document existing on the Envision Portal:
Go to the document from which you want to create a new one.
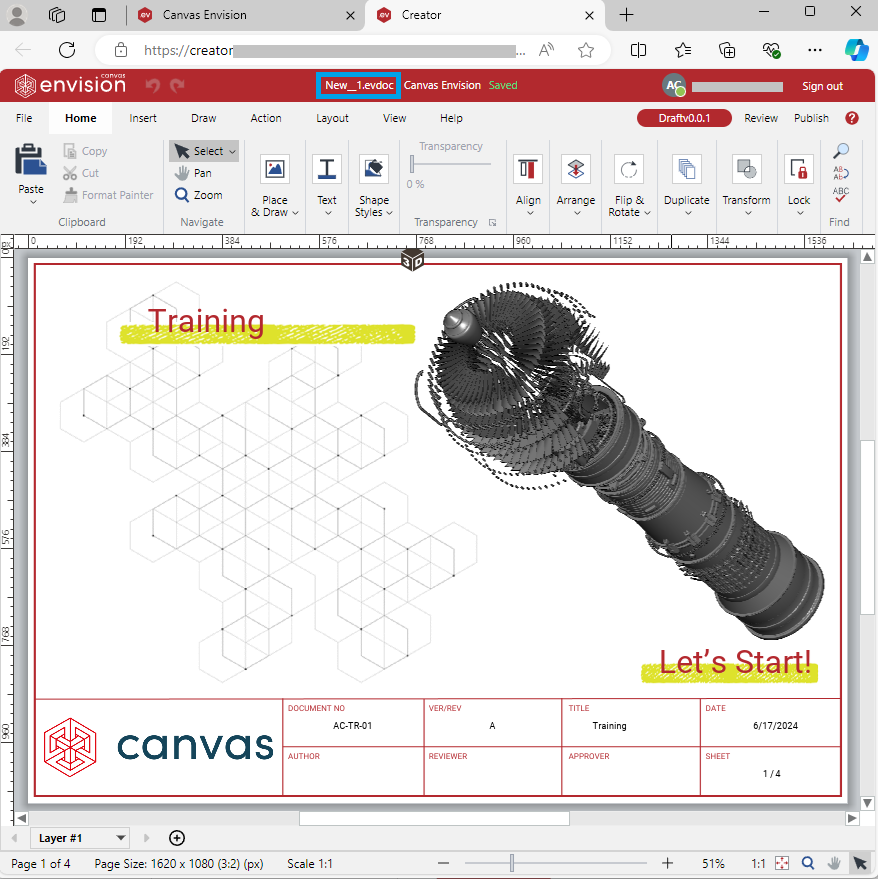
Click the Open as Template button from the file action menu.

The system opens the Canvas Envision Creator application in another browser tab, saving the given document as a new one.
Continue creating the document with the Canvas Envision Creator application.
Downloading files
To download the latest version of an existing Envision document from the Envision Portal to your local machine:
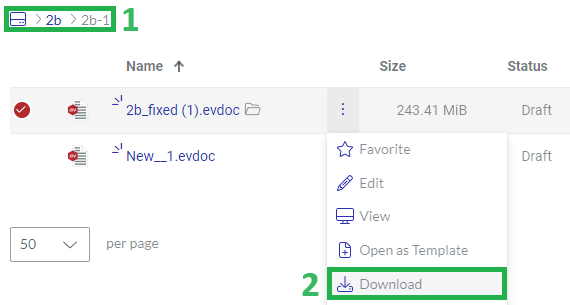
Go to the document which you want to download.
Click the Download button from the file action menu.
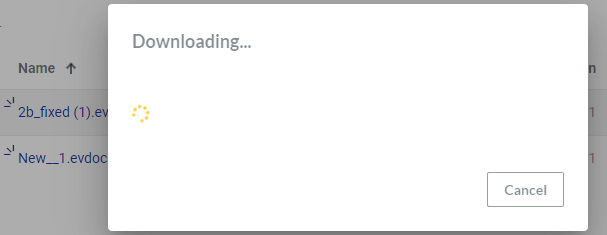
The Downloading dialog pops up displaying the progress.
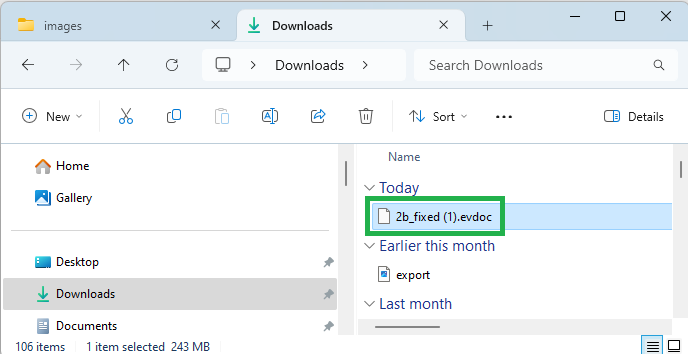
Once the downloading is complete, go to the folder with the downloaded file on your machine.
Unlocking files
The system automatically locks an Envision document when you open it in the Canvas Envision Creator to protect it from editing by another person. Only one person can edit one document in one Canvas Envision Creator instance (browser tab) simultaneously.
Opened documents have an open folder icon after their names in the content table. Hovering over the icon displays a tooltip telling who has opened the document and when.
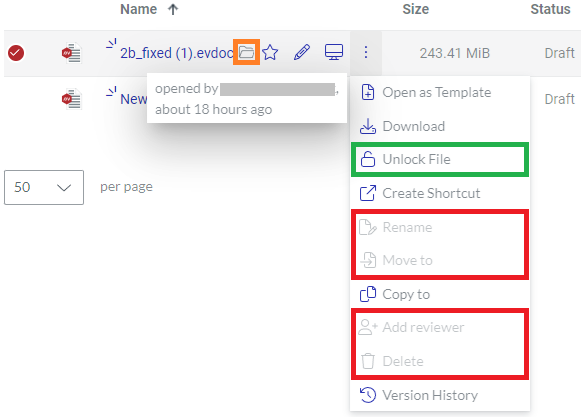
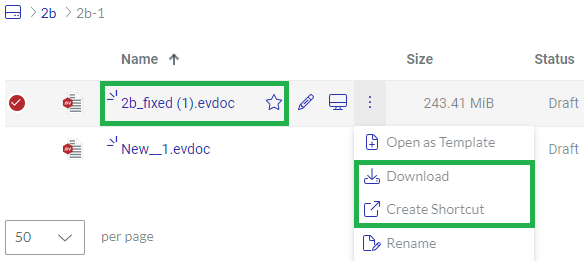
The action menu for locked documents includes the Unlock File button for Admins to unlock such documents. The button is visible but not active for Creators. Additionally, the following action menu buttons are disabled for everyone:
Rename
Move to
Add reviewer
Delete
All other buttons and features are available. You can view, open as a template, copy, and download opened files.
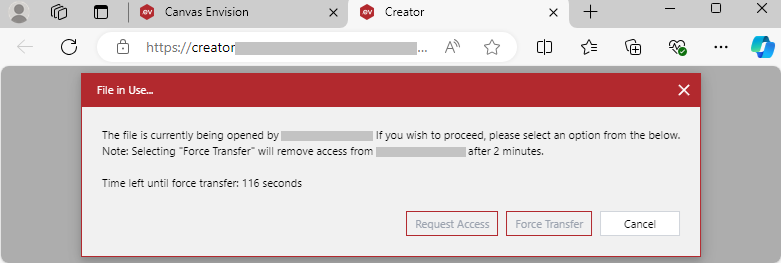
When you open a locked document for editing, the system does not open it but raises the File in Use dialog in the Canvas Envision Creator in a new browser tab.

The File in Use dialog has the following buttons:
Request Access: to ask the user to transfer document editing to you.
Force Transfer: to transfer document editing to you if the user has not responded during the following two minutes.
Cancel: to dismiss opening the document for editing.
Thus, there are three ways to unlock opened documents:
By Admins
By requesting the user
By force
Which way is better depends on the situation. It should not disrupt the collaborative work on the document anyway. The tooltip should give you a clue. For example, if the document has been locked for a long time, like more than 8 hours or multiple days, it is quite likely that the user has opened the document but is not currently working on it. Another example is when the user is out of the office or is not on the team anymore.
Unlocking files by Admins
If you are an Admin, you can unlock an opened Envision document as follows:
Go to the opened document you want to unlock.
Ensure unlocking the document will not disrupt the user's work on it.
Click the Unlock File button from the file action menu.
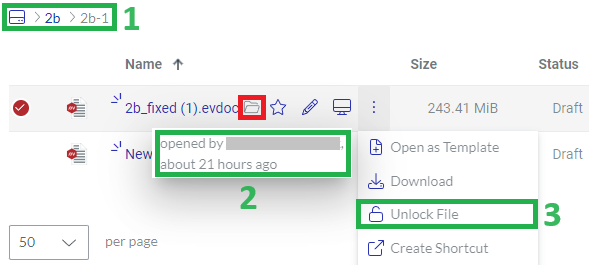
The document is unlocked: the open folder icon and the Unlock File button disappear.
Unlocking files by request
To unlock an opened Envision document by asking the user who has opened it to transfer it to you:
Go to the opened document you want to unlock.
Open the document for editing in the Canvas Envision Creator application.
In the File in Use dialog, click the Request Access button.

The Open Session Transfer Requested dialog pops up for that user on top of the document opened in the Canvas Envision Creator, asking that user to transfer the file to you.
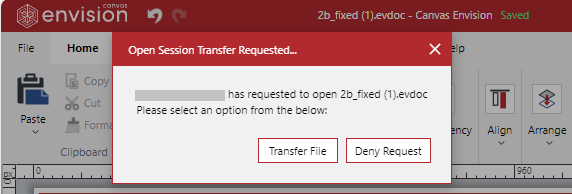
Once that user clicks the Transfer File button in the Open Session Transfer Requested dialog, the document will be unlocked for you: the Canvas Envision Creator will show you the document in editing mode.

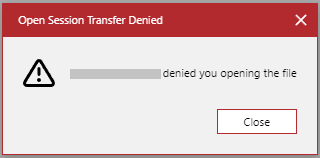
If that user clicks the Deny Request button in the Open Session Transfer Requested dialog, you will see the Open Session Transfer Denied dialog, informing you that the user has rejected your request, and the document will remain locked.
Unlocking files by force transfer
To unlock an opened Envision document by force transfer:
Go to the opened document you want to unlock.
Ensure unlocking the document will not disrupt the user's work on it.
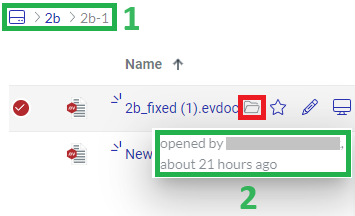
Open the document for editing in the Canvas Envision Creator application.
In the File in Use dialog, click the Force Transfer button.
The Open Session Force Transfer Requested dialog pops up for that user on top of the document opened in the Canvas Envision Creator, asking that user to transfer the file to you.

If either:
That user has clicked the Save and Close button in the Open Session Force Transfer Requested dialog.
Two minutes have elapsed and that user has not clicked the Deny Request button in the Open Session Force Transfer Requested dialog.
The document will be unlocked for you: the Canvas Envision Creator will show you the document in editing mode.

If that user has clicked the Deny Request button in the Open Session Force Transfer Requested dialog during the two minutes, you will see the Open Session Transfer Denied dialog, informing you that the user has rejected your request, and the document will remain locked.

File shortcuts
A file shortcut is an internal workspace link to view or download an Envision document. You can use shortcuts to share Envision documents with workspace members for viewing or downloading. Users cannot edit the documents shared with shortcuts.
Creating shortcuts
To create a shortcut to a document in the workspace:
Go to the document for which you want to create the shortcut.
Click the Create Shortcut button from the file action menu.
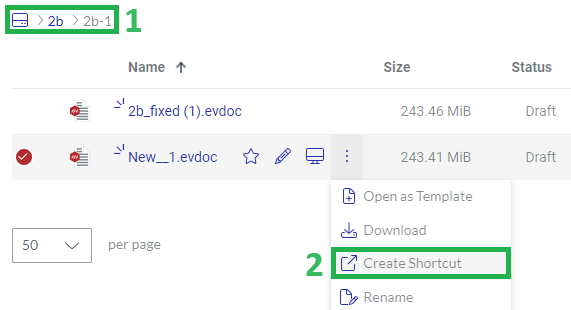
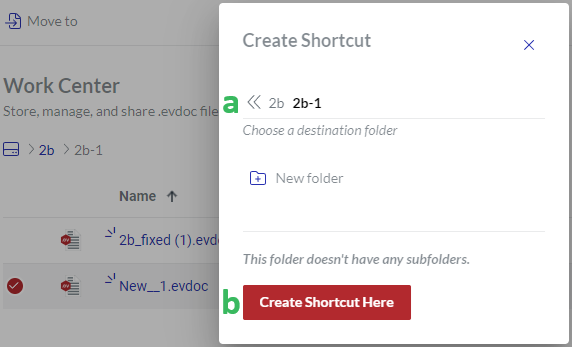
The Create Shortcut dialog pops up and displays the work centers in the workspace.
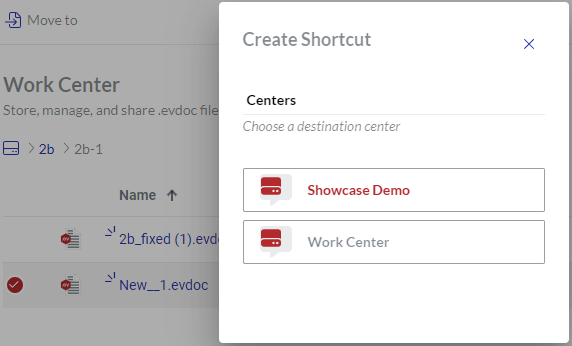
In the Create Shortcut dialog:
Specify the work center and folder where the shortcut should be.
Click the Create Shortcut Here button.
The Creating Shortcut dialog pops up and displays the creation progress.
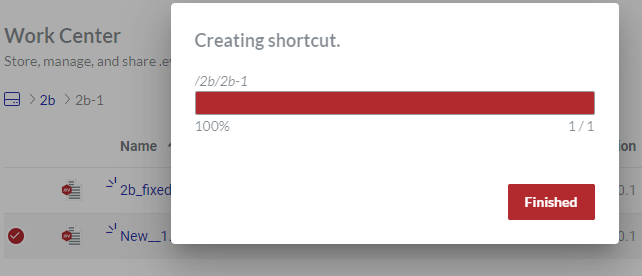
Once the creation is completed, click the Finished button. The new shortcut is created.
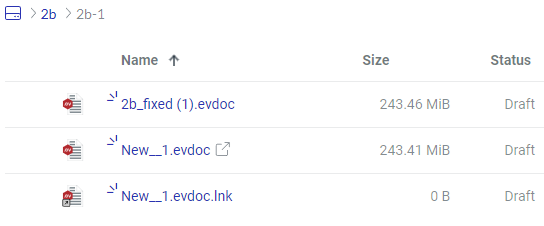
Differing shortcuts from files

Envision documents and shortcuts visually differ as follows:
The filenames of Envision documents include the .evdoc extension by default.
Envision documents with shortcuts have the Shortcut icon after their names. The Shortcut icon is a transparent square with an arrow heading from the square center to the top right.
The icons of shortcuts include the Shortcut picture in the bottom left corner. The Shortcut picture is a grey square with a black arrow heading from the bottom left to the top right corner.
The filenames of shortcuts include the .lnk extension by default.
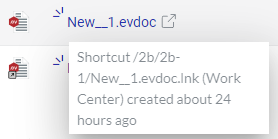
Shortcut tooltip
Hovering over the shortcut icon after a filename displays a tooltip telling the shortcut location and when it was created.
Action menu for shortcuts
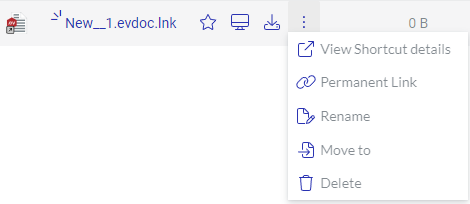
For a shortcut pointing to a file, the action menu features the following options:
Favorite: to add or remove the shortcut from Favorites. It is filled with blue for shortcuts in Favorites.
View: to open the latest version of the pointed document in the Canvas Envision Web Viewer for viewing as an end document user.
Download: to download the latest version of the pointed document from the Portal to the local machine.
View Shortcut Details: to view the shortcut details.
Permanent Link: to create a permanent link for the shortcut.
Rename: to give the shortcut another name.
Move to: to move the shortcut to another folder or work center.
Delete: to remove the shortcut from the workspace permanently.
Viewing files via their shortcuts
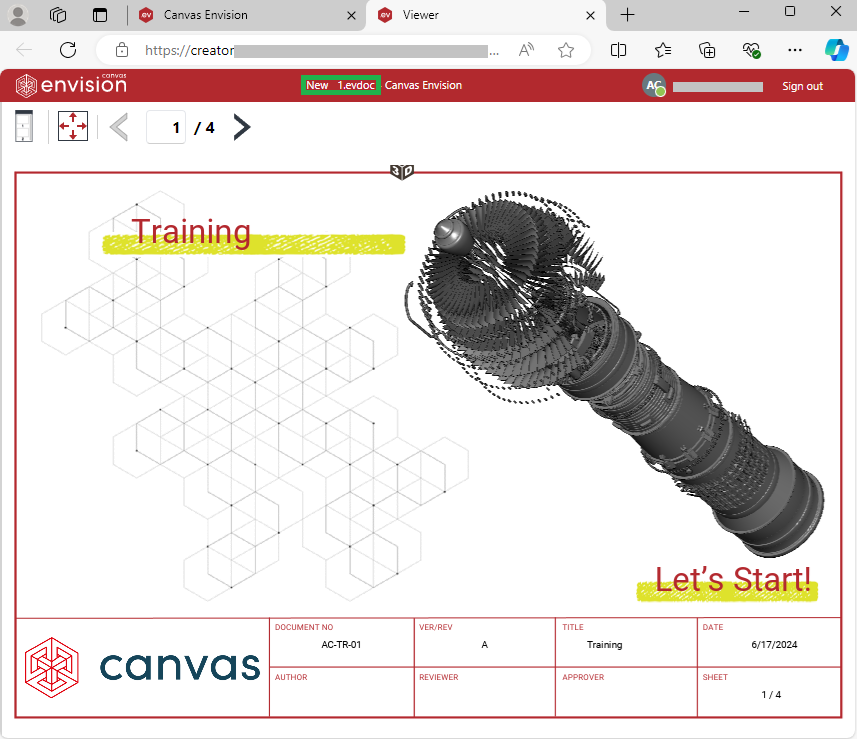
To view the latest version of the document to which points a shortcut in the Canvas Envision Web Viewer:
Go to the shortcut whose document you want to view.
Either:
Click the filename of the shortcut in the content table row.
Click the View button from the shortcut action menu.

The system opens the document in the Canvas Envision Web Viewer in another browser tab.
Viewing shortcut details
To view the details of a shortcut:
Go to the shortcut which you want to view.
Click the View Shortcut Details button from the shortcut action menu.

The Shortcut details dialog pops up and displays the following:
The document to which the shortcut points.
The shortcut creator.

Permanent links
A permanent link is an external link to a published version of a given Envision document. For details, see Managing Permanent Links.
Creating permanent links with the file action menu
To create a permanent link with the file action menu:
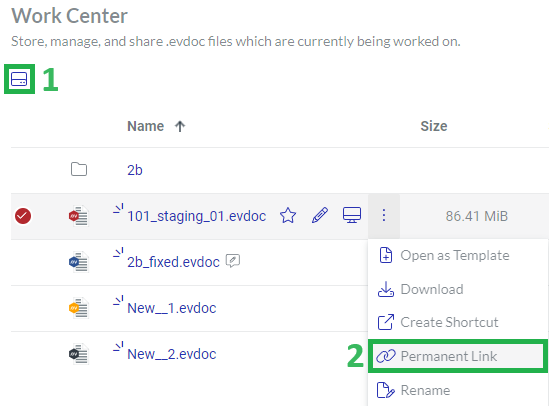
Go to the document to which you want to create a permanent link.
Click the Permanent Link button from the file action menu.
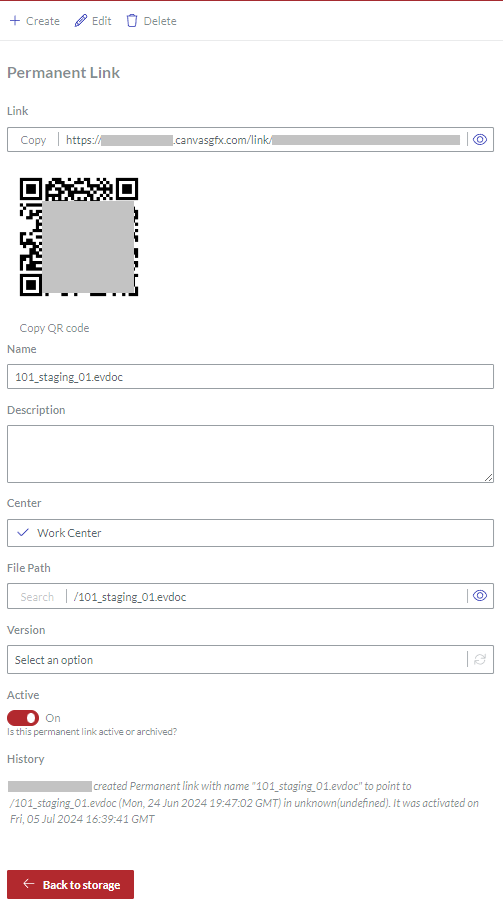
The system automatically opens the Create Permanent Link page with the fields prepopulated for the given document.
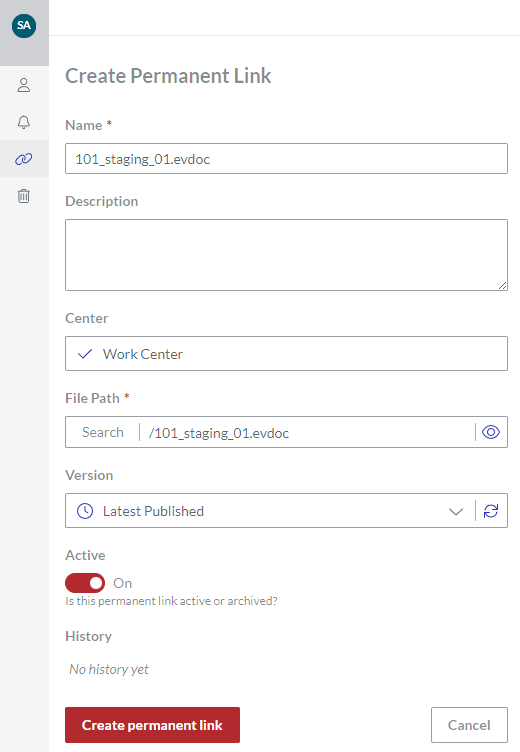
Optionally, in the Name field, update the name of the link if necessary. It is the name of the shared document by default.
Optionally, in the Description field, enter a short description of the link or document. This field is not required.
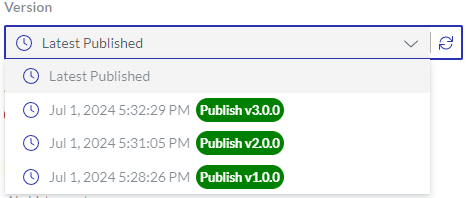
Optionally, from the Version drop-down list, select the version to which the permanent link should point. Latest Published is selected by default.
Click the Create permanent link button. The system creates the permanent link and displays it to you on the Permanent Link page.
Click either:
The Back to storage button on the Permanent Link page to go to the folder with the document for which you have created the permanent link.
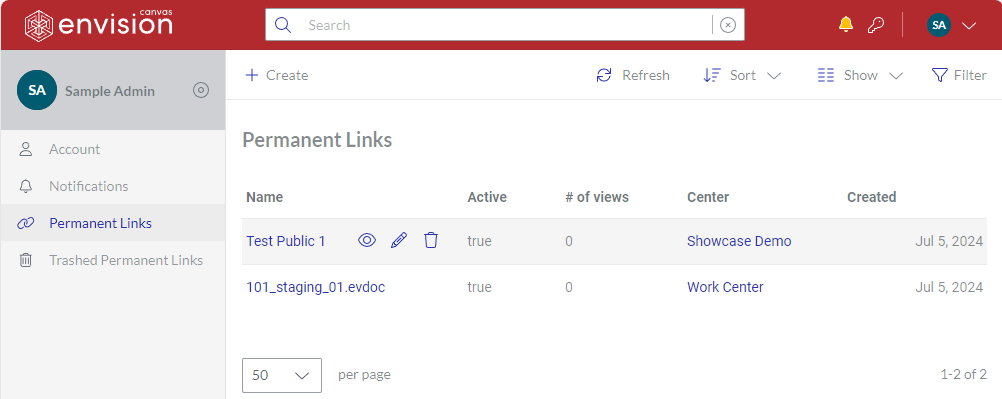
The Permanent Links button on the sidebar to go to the Permanent Links page.
Permanent Link icon and tooltip
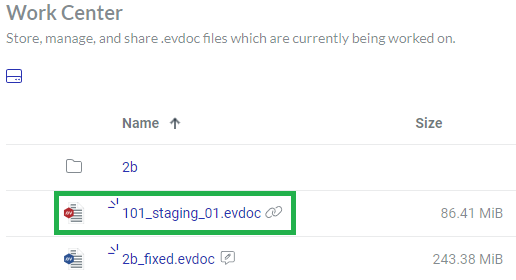
A document with a permanent link has the Permanent Link icon after the filename. The icon is two connected light-grey chain links. Hovering over the icon displays a tooltip telling when the permanent link was created.

Sharing permanent links with the file action menu
To copy and share an existing permanent link to an Envision document with the file action menu:
Go to the document with the permanent link which you want to share.
Click the Copy Permanent Link button from the file action menu.
At the screen bottom, the notification dialog pops up and tells that the permanent link is copied to the clipboard.
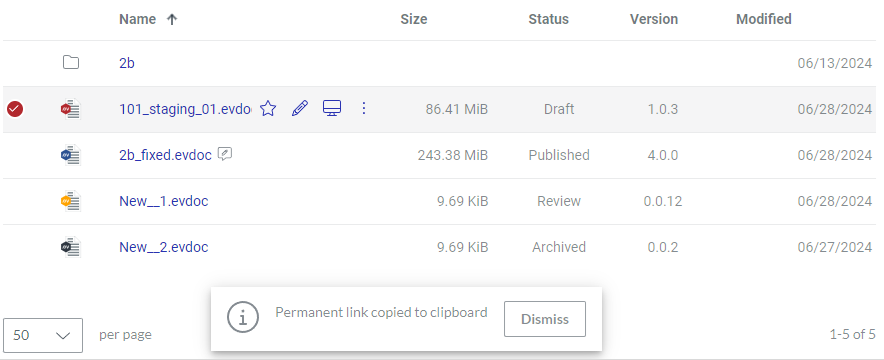
In the notification dialog, click the Dismiss button.
Share the link from the clipboard with the users.
Moving files
You can move one or more documents and shortcuts at the same time.
Moving one file
To move a document or shortcut to another folder or work center in the workspace:
Go to the document or shortcut you want to move.
Click the Move to button from the file action menu.
The Move 1 Item dialog pops up and displays the work centers in the workspace.
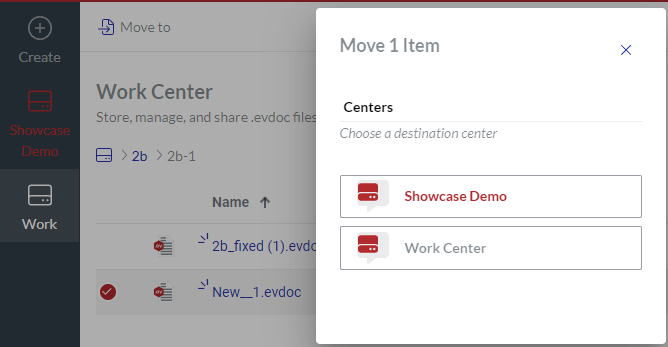
In the Move 1 Item dialog, specify the work center and folder where the document should be moved.
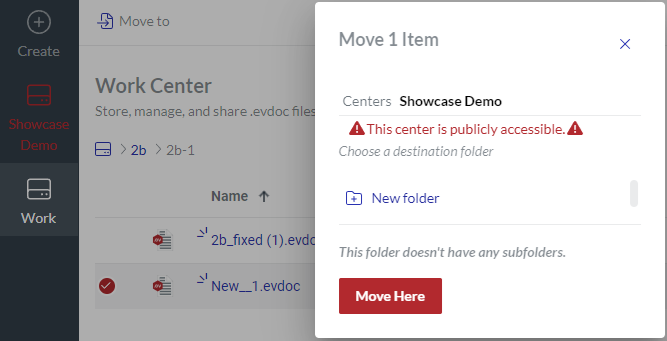
If necessary, create a new folder with the New folder link; see Creating folders when moving or copying items.
Click the Move Here button. The Moving 1 Item dialog pops up and displays the movement progress.
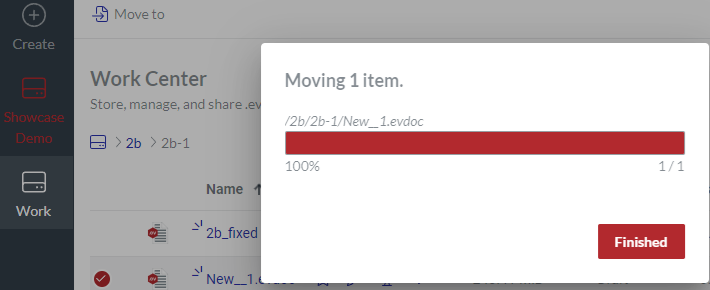
Once the movement is completed, click the Finished button. The document is moved to the specified work center and folder.
If necessary, go to the destination work center and folder to see the moved document.

Moving multiple files
To move multiple documents or shortcuts to another folder or work center in the workspace:
Go to the documents or shortcuts you want to move.
Select the documents.
Click the Move to button on the content toolbar.
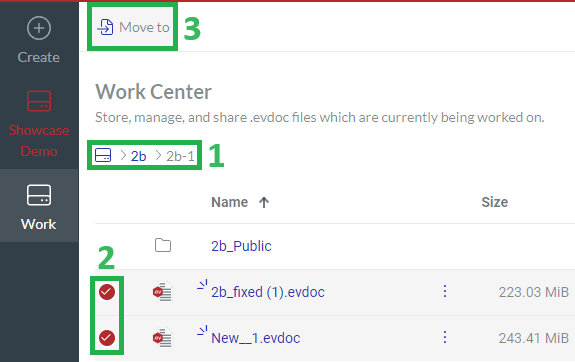
The Move Items dialog pops up and displays the work centers in the workspace. The dialog title includes the number of moved documents.
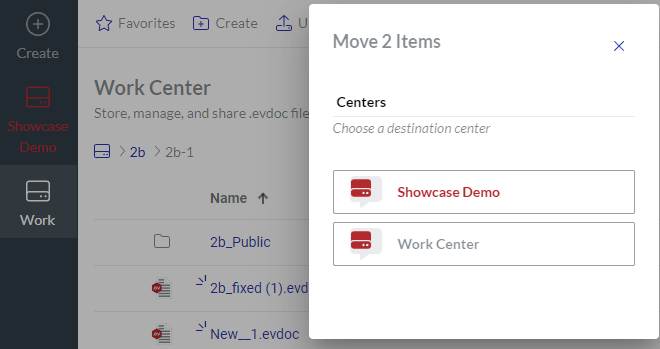
In the Move Items dialog, specify the work center and folder where the documents should be moved.
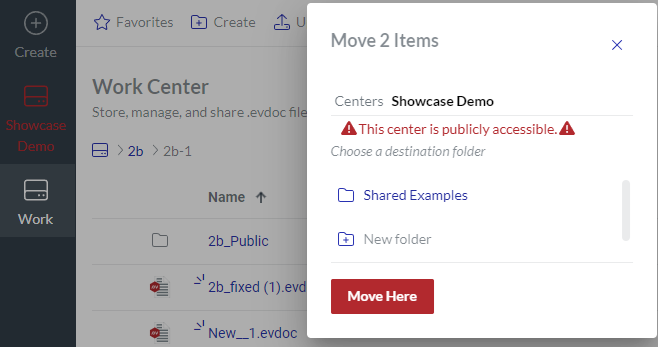
If necessary, create a new folder with the New folder link; see Creating folders when moving or copying items.
Click the Move Here button. The Moving Items dialog pops up and displays the movement progress.
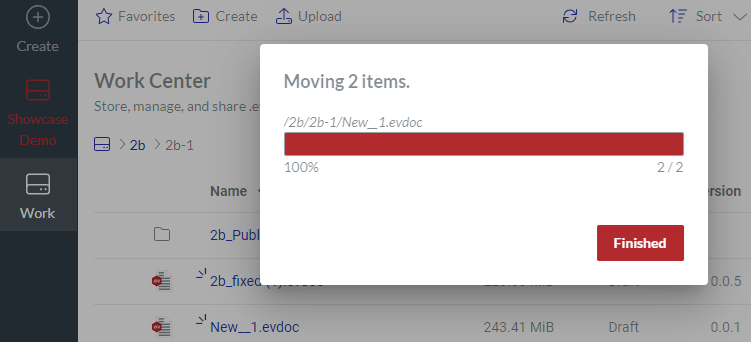
Once the movement is completed, click the Finished button. The documents are moved to the specified work center and folder.
If necessary, go to the destination work center and folder to see the moved documents.
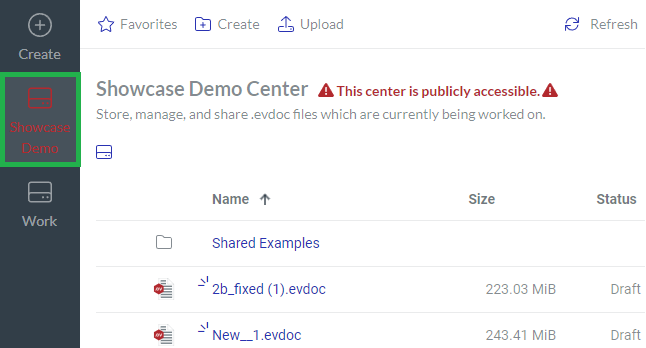
Copying files
You can copy one or more documents at the same time.
Copying one file
To copy a document:
Go to the document you want to copy.
Click the Copy to button from the file action menu.
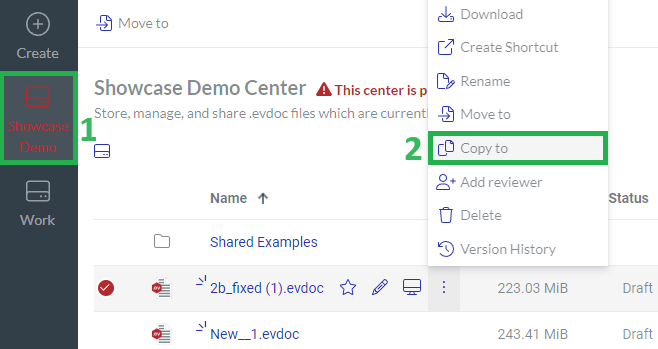
The Copy 1 Item dialog pops up and displays the work centers in the workspace.
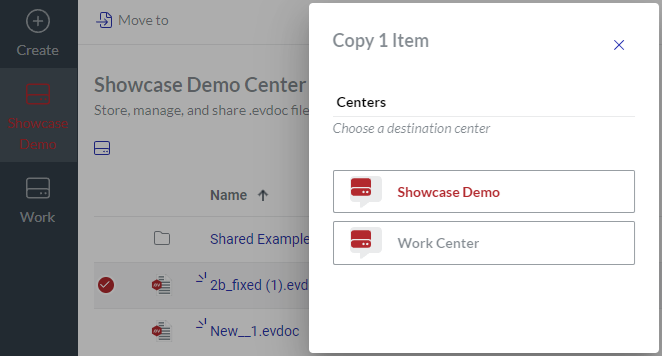
In the Copy 1 Item dialog, specify the work center and folder where the document should be copied.
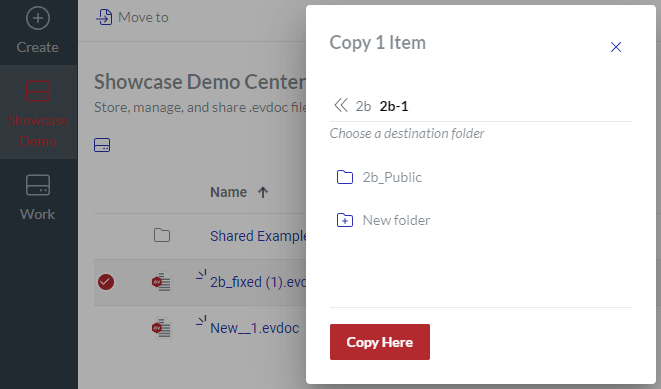
If necessary, create a new folder with the New folder link; see Creating folders when moving or copying items.
Click the Copy Here button. The Copying 1 item dialog pops up and displays the copying progress.
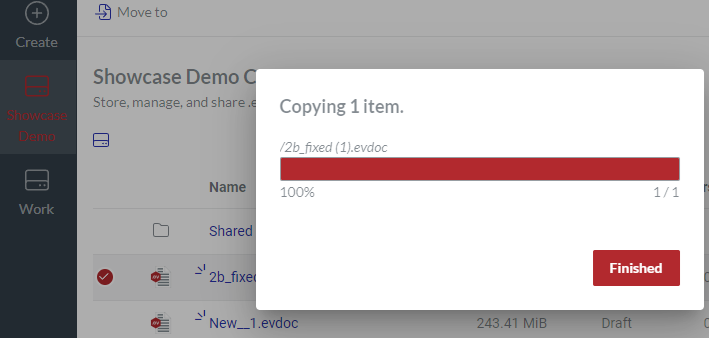
Once copying is completed, click the Finished button. The document is copied to the specified work center and folder.
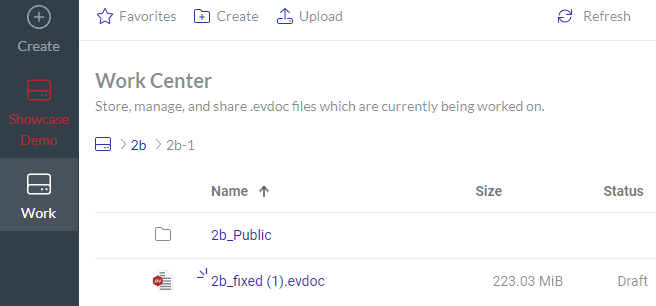
If necessary, go to the destination work center and folder to see the copied document.
Copying multiple files
To copy multiple documents:
Go to the documents you want to copy.
Select the documents.
Click the Copy to button from the file action menu of a selected document.
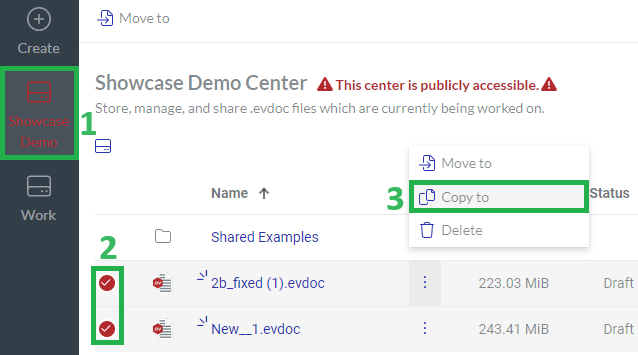
The Copy Items dialog pops up and displays the work centers in the workspace. The dialog title includes the number of copied documents.
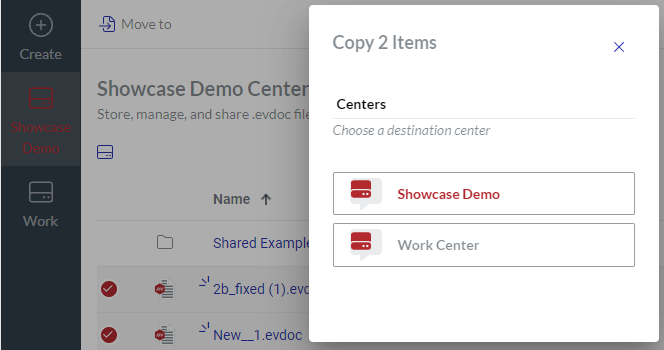
In the Copy Items dialog, specify the work center and folder where the documents should be copied.
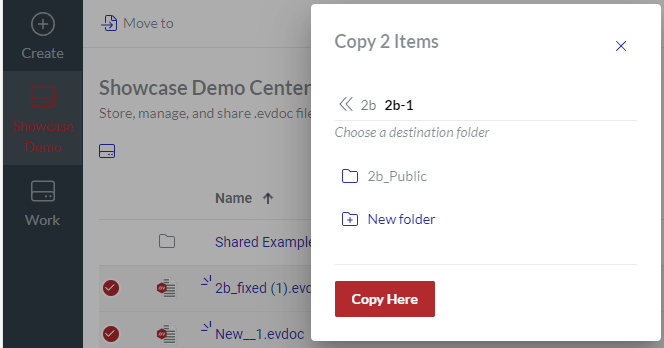
If necessary, create a new folder with the New folder link; see Creating folders when moving or copying items.
Click the Copy Here button. The Copying items dialog pops up and displays the copying progress.
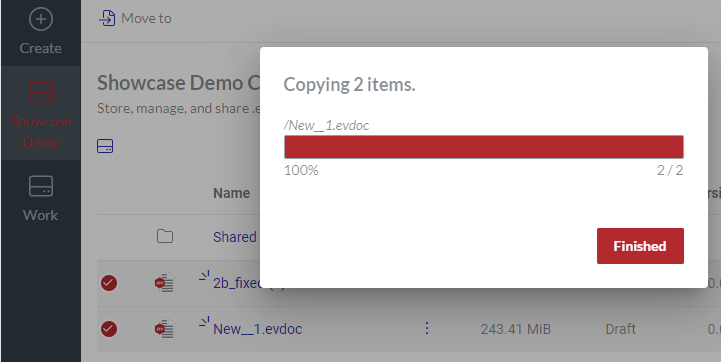
Once copying is completed, click the Finished button. The documents are copied to the specified work center and folder.
If necessary, go to the destination work center and folder to see the copied documents.
Submitting files for review
You can submit an Envision document with the Draft or Review status to another user in the workspace for review. The Add reviewer action menu button is not visible for the documents with other statuses.
Understanding the review process
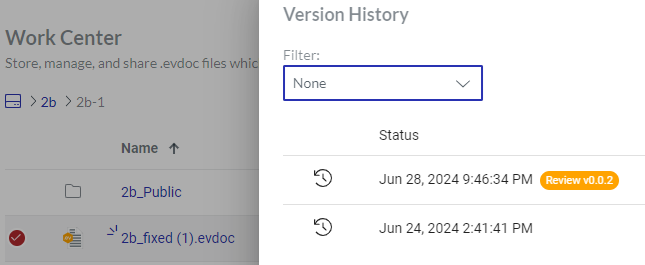
After you have submitted a document for review, the system automatically increases the minor version number of that document by one and updates its status as follows:
Changes Draft to Review.
Keeps Review.
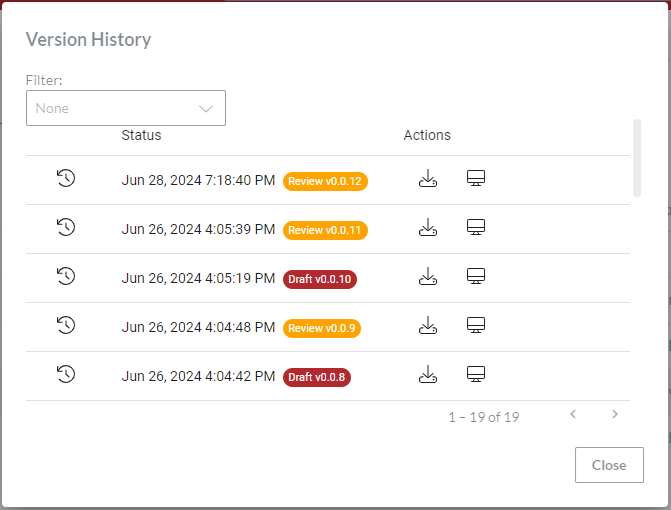
Only one person can review the document at the same time. When multiple people should review the document, a review chain should be established. Once done, the current reviewer should submit the document to the next reviewer. You can use the minor version number from the Version History dialog to track the review chain.
When all the reviewers have reviewed the document, its status should be updated accordingly. For example, it can be set to:
Draft if updates are necessary.
Published if the document is approved for release.
Adding reviewers
To submit an Envision document to another user for review:
Go to the document you want to send to review.
Click the Add reviewer button from the file action menu.
The Add reviewer dialog pops up and displays the following label:
There are no reviewer assigned to this file.
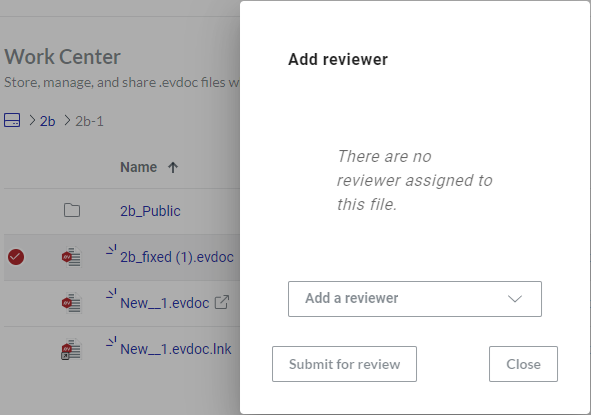
Select the reviewer from the Add a reviewer drop-down list of users.
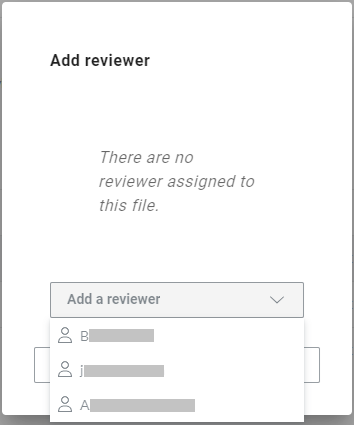
The field with the name of the selected user replaces the label in the dialog. The Add a reviewer drop-down list becomes frozen.
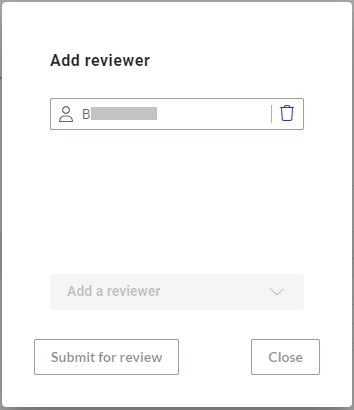
If another user should be reselected:
Click the bin button in the field after the given reviewer's name.

The label replaces the field. The Add a reviewer drop-down list becomes active.
Select the correct reviewer by repeating the previous step.
Click the Submit for review button. The document is submitted to the specified user for review. The system automatically updates the status and minor version of the document.
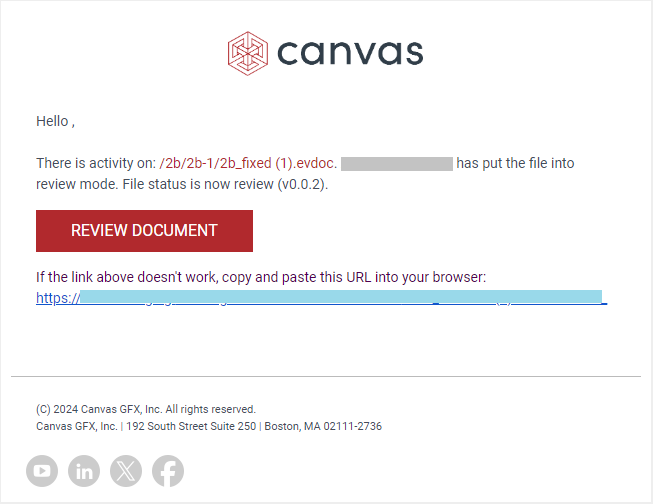
The reviewer receives a Canvas Envision Notification email with a link to review the document.
Deleting files
You can permanently delete one or more documents and shortcuts from the workspace on the Portal simultaneously.
Deleting one file
To delete an existing document or shortcut from the workspace permanently:
Go to the document or shortcut you want to remove from the Portal.
Click the Delete button from the file action menu.
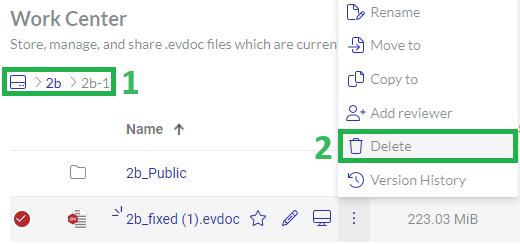
The Delete Files dialog pops up.
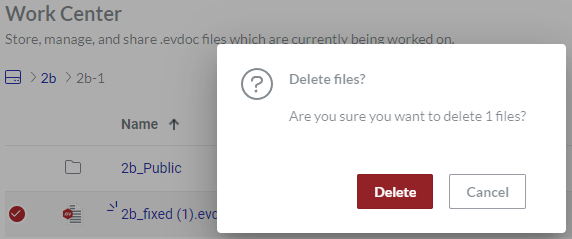
In the Delete Files dialog, click the Delete button. The Deleting 1 item dialog pops up and displays the deletion progress.
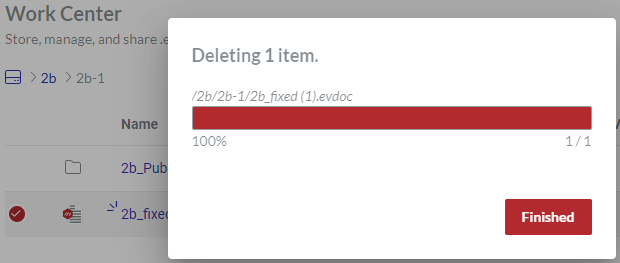
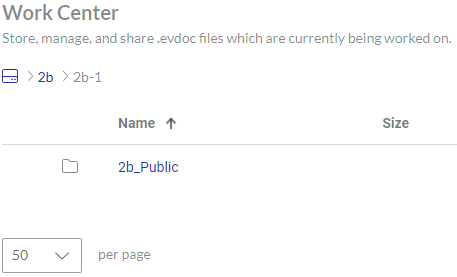
Once the deletion is completed, click the Finished button. The document is permanently deleted from the workspace.
Deleting multiple files
To delete multiple existing documents and shortcuts from the workspace permanently:
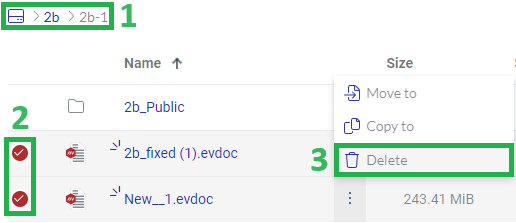
Go to the documents and shortcuts you want to remove from the Portal.
Select the documents and shortcuts.
Click the Delete button from the file action menu of a selected document.
The Delete Files dialog pops up.
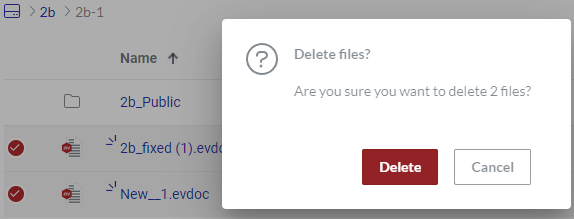
In the Delete Files dialog, click the Delete button. The Deleting items dialog pops up and displays the deletion progress.
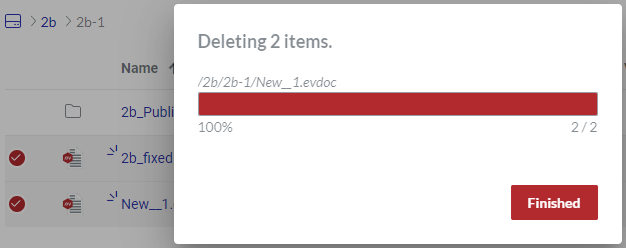
Once the deletion is completed, click the Finished button. The documents are permanently deleted from the workspace.

File version history
The Portal automatically saves an Envision document and tracks its history of versions. You can explore this history as well as view a document version in the Canvas Envision Web Viewer and download it to your local machine.
Version History pop-up dialog
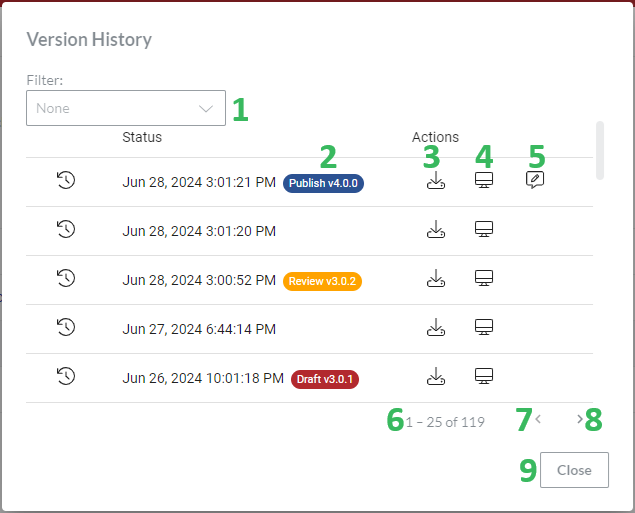
The Version History pop-up dialog displays the versions of a given document in a table and provides the following features:
The Filter drop-down list to filter the versions against the version statuses (2).
The Status tag that displays the status and version number the document gets in a given version.
The Download evdoc button to download a given version to the local machine as an evdoc file.
The Open in WebViewer button to view a given version in the Canvas Envision Web Viewer.
The View Feedback button to view feedback on a given published version in the Canvas Envision Web Viewer. This button is visible only for versions with the Published tag and feedback.
The paginator that displays the number of versions on the current table page out of the total number of versions.
The Previous page button to go to the previous table page.
The Next page button to go to the next table page.
The Close button to close the Version History dialog.
Exploring file version history
To explore the version history of an Envision document:
Go to the document whose history of versions you want to see.
Click the Version History button from the file action menu.
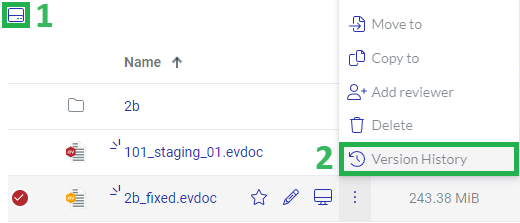
The Version History dialog pops up.
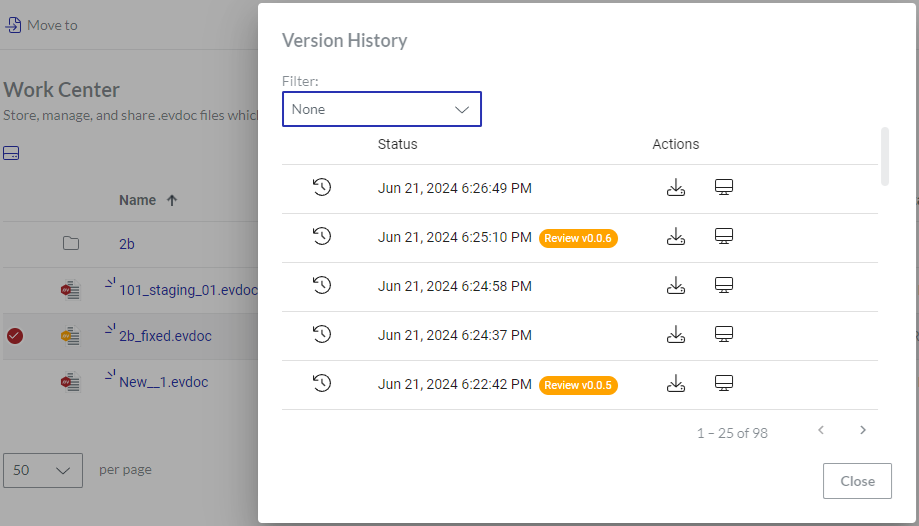
In the Version History dialog, use the scrollbar or mouse wheel and click the Previous page and Next page buttons to navigate the versions in the table.
If necessary, select a status from the Filter drop-down list to filter the versions against it.
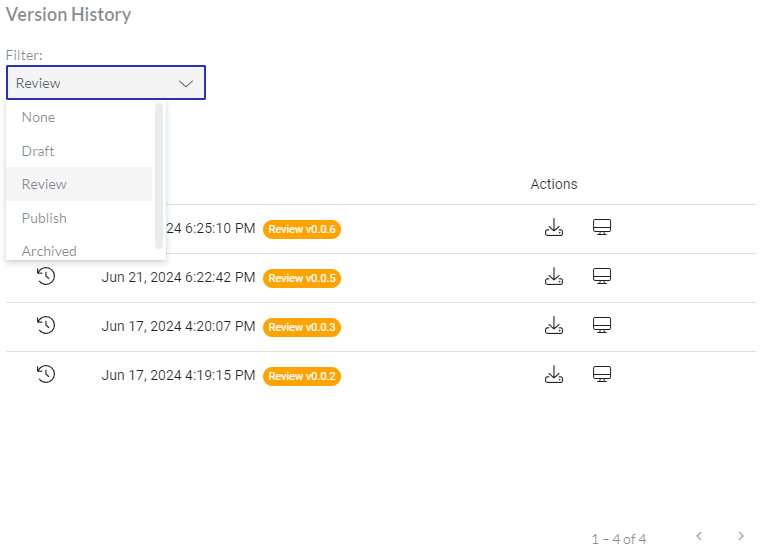
If necessary, click the Open in WebViewer button to view a given version in the Canvas Envision Web Viewer in another browser tab.
If necessary, click the Download evdoc button to download a given version to the local machine as an evdoc file.
If necessary, click the View Feedback button to view the feedback on a given version in the Canvas Envision Web Viewer in another browser tab. This option is availale only for versions with the Published status tag and feedback.
Once you are done, click the Close button to dismiss the Version History dialog.