Main Working Area
The main working area is the page layout area where you create all the document content and the tools to facilitate the creation process.
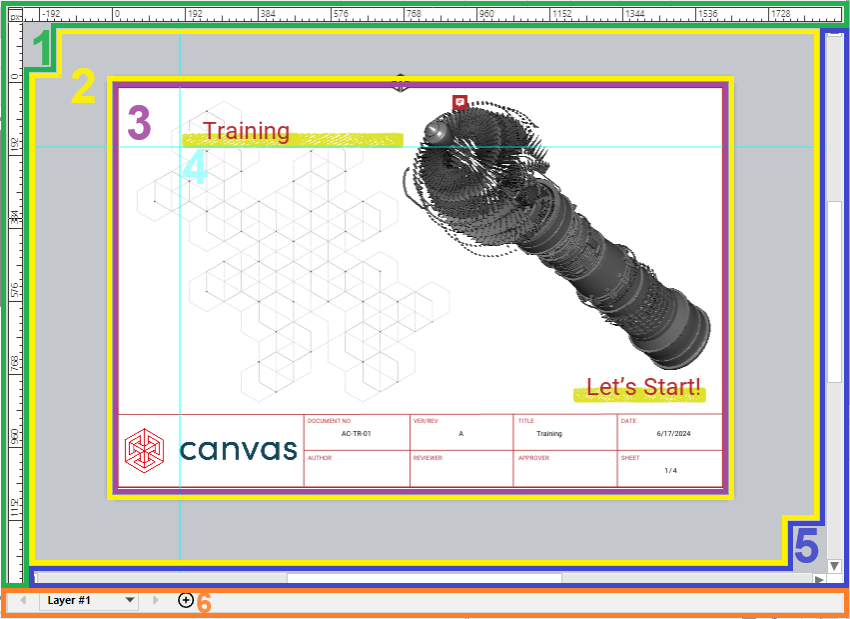
The main working area includes the following:
Rulers: an aid tool to measure distances in the page layout area and to set up guides.
Pasteboard: an additional space to place objects before using them in an illustration.
Page layout area: the page canvas to create illustrations and page layouts.
Guides: guidelines to help align objects in the page layout area.
Scroll bars: a navigation tool to move the page layout area and pasteboard on the screen.
Layer controls: a set of tools to manage the page layers.
Rulers
The main working area includes the horizontal and vertical rulers on the left and top. They display distances in the units set for the document from the top left corner of the page layout area, whose coordinates are (0, 0). The horizontal (x) coordinate increases to the right and the vertical one (y) - to the bottom. The coordinates decrease in the opposite direction.
_coordinates.png)
When the cursor is in the main working area, the rulers display the cursor coordinates.

Hiding and showing rulers
The rulers are visible by default. You can hide and show them when you wish using the Rulers checkbox in the Show & Enable panel on the View ribbon tab.
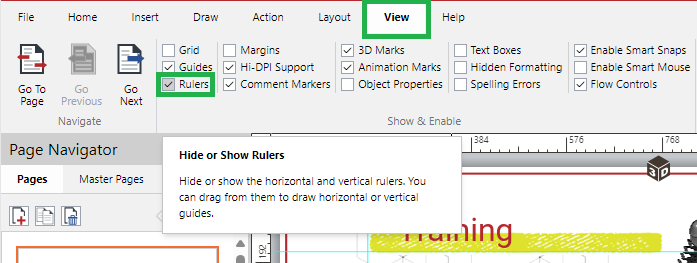
To show and hide the rulers:
Go to the View ribbon tab.
In the Show & Enable tab panel, either:
Clear the Rulers checkbox to hide the rulers.
Select the Rulers checkbox to show the rulers.
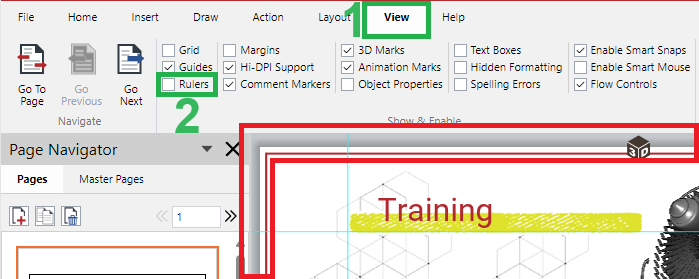
The rulers disappear or appear against your checkbox setting.
Pasteboard
The pasteboard is a grey space around the page layout area for placing objects before using them in an illustration. You can work on such objects with the tools available for them on the ribbon and context-sensitive menu. Objects on the pasteboard are saved in the document but will not be printed.
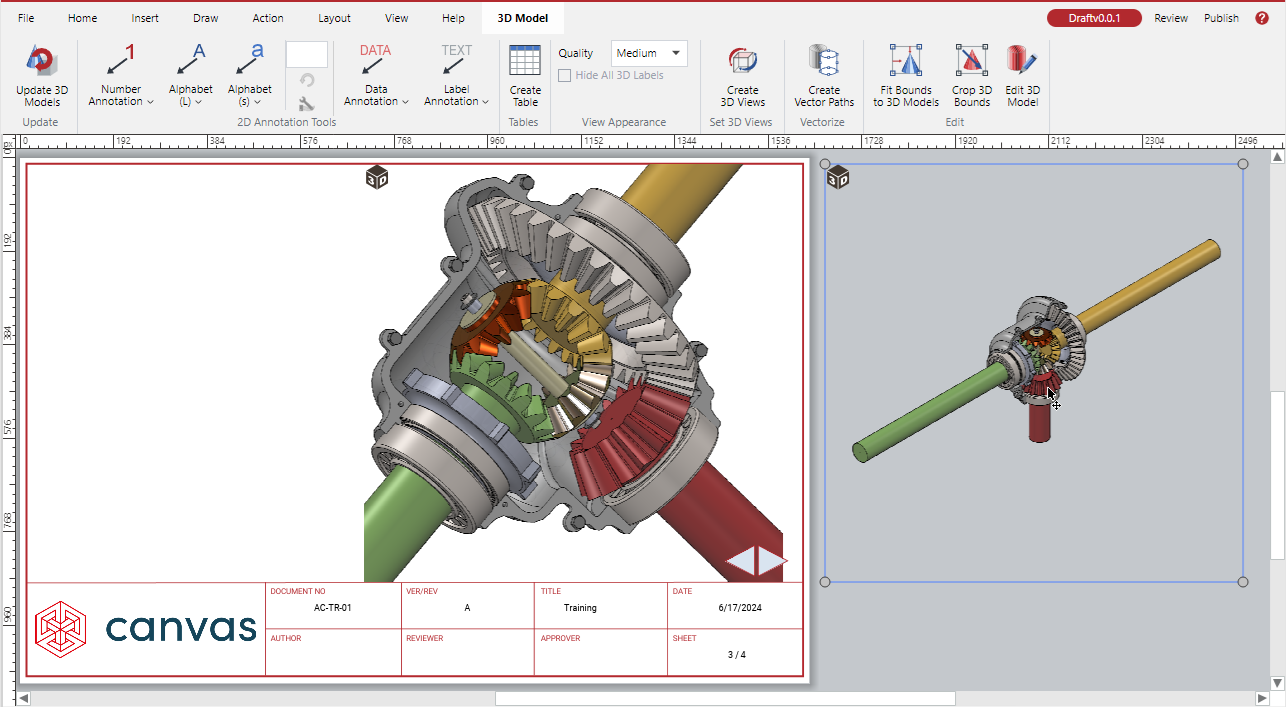
The pasteboard displays the objects for the current page. Navigating document pages updates the pasteboard accordingly.
The pasteboard is always visible.
Pasteboard size
The size of the pasteboard is flexible and depends on the sizes of the browser window, page, and panes. The system automatically adjusts it when you resize the browser window or panes. You can also increase or decrease the pasteboard size visible on the screen by zooming in or out, as discussed in Zooming main working area.
Pasteboard navigation
To navigate the pasteboard, use the scrollbars or the Pan tool, as discussed in Navigating main working area.
Page layout area
The page layout area is the canvas of the current page, where you create interactive illustrations and instructions for the document users by inserting and updating various objects, such as text, tables, 3D models, images, shapes, etc. The page grid can help you in this work. Objects in this area are saved and printed.
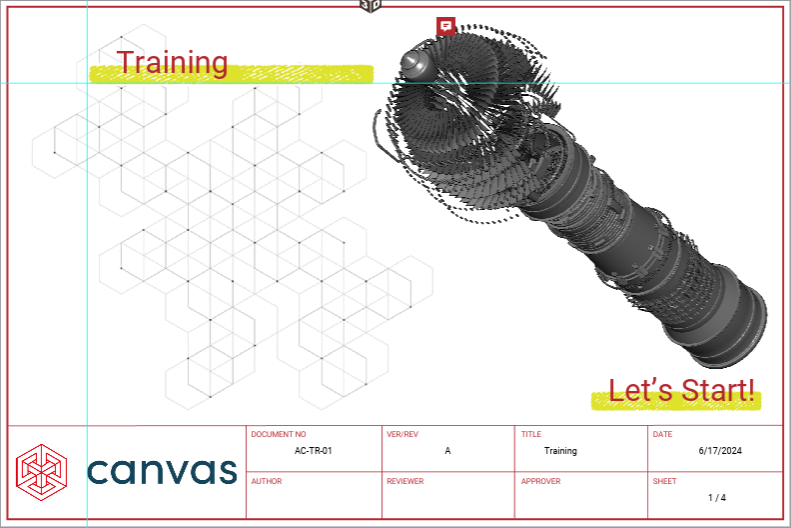
The layout area displays the objects on the current page. Navigating the pages updates the layout area accordingly.
The page layout area is always visible.
Page layout area size
The orientation and actual size of the page layout area are the orientation and actual size of the page. The actual size is in the unit of measure of the document. You set the default document page orientation, size, and unit on document creation and can change them later.
The size of the page layout area visible on the screen is dynamic and relative to the sizes of the browser window and panes. The system automatically adjusts the visible size of the page layout area when you resize the browser window or panes. You can also increase or decrease the visible size by zooming in or out, as discussed in Zooming main working area.
Page layout area navigation
To navigate the page layout area, use the scrollbars or the Pan tool, as discussed in Navigating main working area.
Grid
Once a new page is added, its page layout area is a blank white space with no objects or UI elements on it. You create the page contents by inserting, updating, and moving objects on it. To facilitate this process, you can make the grid visible, enable snapping objects to it, and move it across the page layers.
The grid is horizontal and vertical dotted gridlines on the page. By default, the gridlines are evenly distributed according to the page size and unit of measure. However, you can configure the horizontal and vertical grid spacing and some other grid properties.
Showing and hiding grid
By default, the grid is hidden.
To show or hide the grid:
Go to either:
The Grid checkbox in the Show & Enable panel on the View ribbon tab.

The Show Grid checkbox in the Grid & Guides panel on the Layout ribbon tab.

Either:
Select the checkbox to show the grid.
Clear the checkbox to hide the grid.
The gridlines appear or disappear against your checkbox setting.
When on, the grid is visible on all document pages but only when editing the document. It is not printed and is absent when viewing the document in the Canvas Envision Web Viewer.
Snap to Grid feature
The Creator can assist you in aligning objects in the illustration with the Snap to Grid feature. To learn how to use it, refer to the Snapping Objects to Grid section.
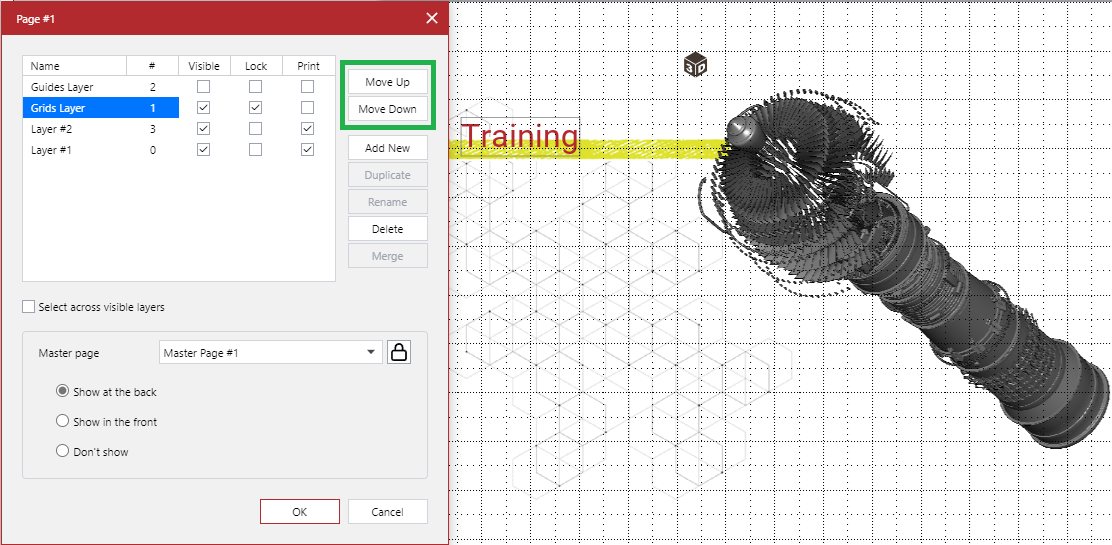
Grids Layer
By default, the grid is on the page background below the objects on the page.
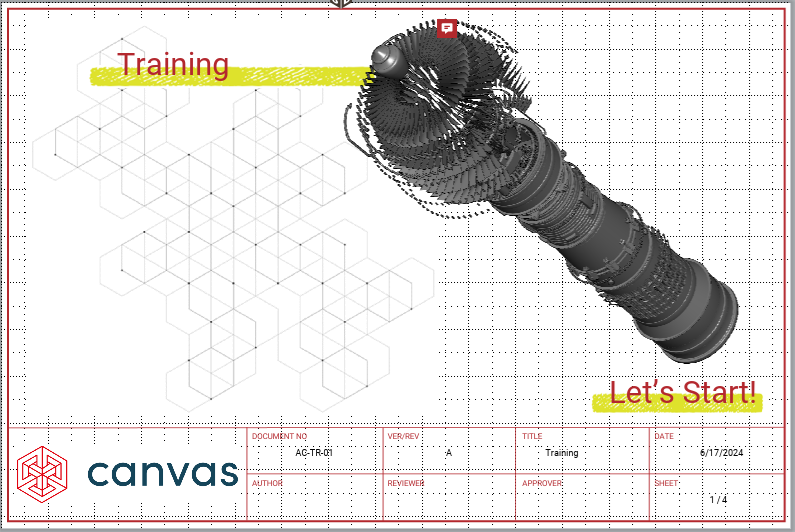
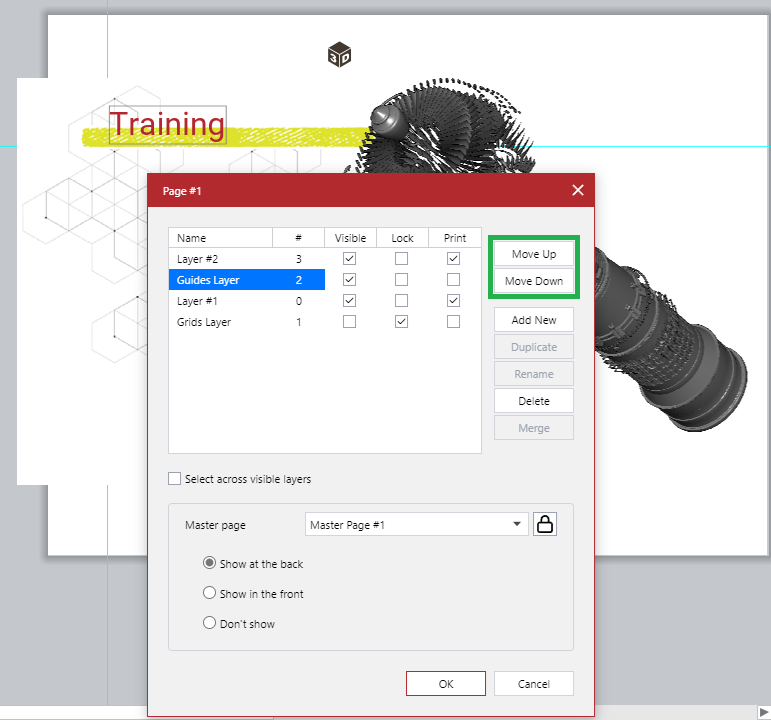
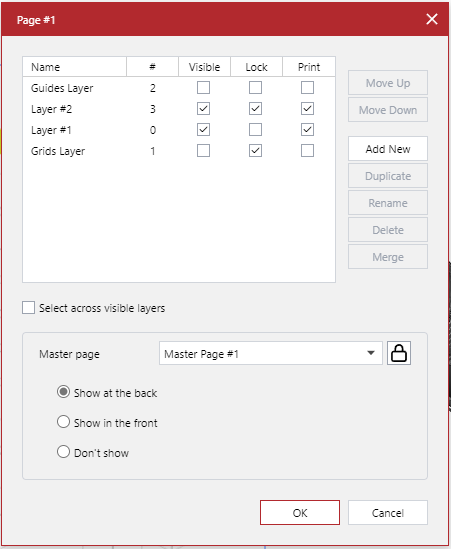
You can move the grid on top of or below the layers of a given page by moving up or down the Grids Layer in the Page# pop-up dialog. To learn how to call this dialog, see Layer controls.
Configuring the grid
To configure the properties of the grid:
Click the Set Up Grid & Guides button in the Grid & Guides panel on the Layout ribbon tab.

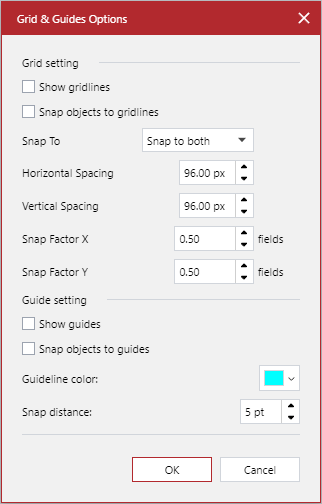
The Grid & Guides Options dialog pops up.
In the Grid setting pane of the Grid & Guides Options pop-up dialog, set the values as you need.
When you are done, click the OK button.
Grid properties
The Grid setting pane of the Grid & Guides Options pop-up dialog provides the following properties of the grid for configuration:
Show gridlines: to show or hide the grid.
Snap objects to gridlines: to enable or disable snapping objects to the grid.
Snap To: to select to which gridlines the system should snap objects, either:
Snap to both: vertical and horizontal.
Snap horizontally: horizontal only.
Snap vertically: vertical only.
Horizontal Spacing: a horizontal distance between vertical gridlines.
Vertical Spacing: a vertical distance between horizontal gridlines.
Snap Factor X: the division of the horizontal spacing. An object will also snap to those division lines that may not be visible.
Snap Factor Y: the division of the vertical spacing. An object will also snap to those division lines that may not be visible.
Grid snap factor examples
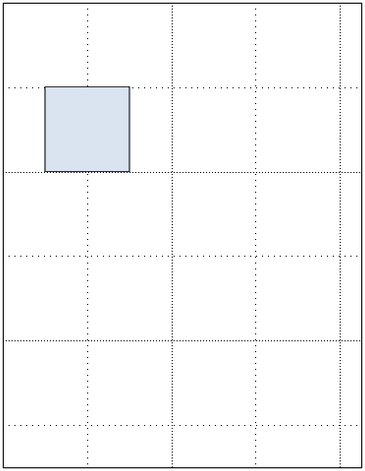
The visible gridlines look different, but the snapping-to-grid behavior is identical in both cases. Sometimes, too many gridlines may look too busy.
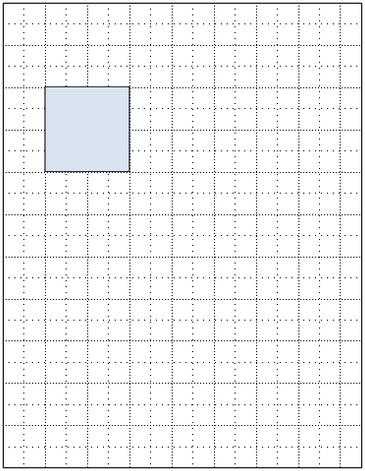
Horizontal Spacing: 1 in
Vertical Spacing: 1 in
Snap Factor X: 1.00
Snap Factor Y: 1.00
Horizontal Spacing: 4 in
Vertical Spacing: 4 in
Snap Factor X: 0.25 = 1/4
Snap Factor Y: 0.25 = 1/4
Guides
Guides are horizontal and vertical electric blue lines arbitrarily placed on the page layout area and pasteboard to assist you in aligning objects in the illustration. One page can have no, one, or more than one guide.
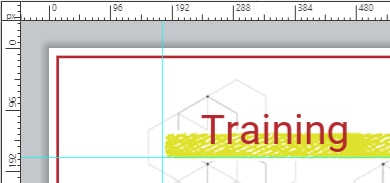
By default, the main working area has no guides, but they are visible on top of the objects on the page. You can toggle their visibility across the document and add, move, delete, and edit them on a given page as you need.
Additionally, you can move the guides layer on a given page and configure the properties of the guides in the document.
Hiding and showing guides
By default, the guides are visible. When they are hidden, placing a guide on a page automatically makes all the guides visible.
To hide or show all the guides:
Go to either:
The Guides checkbox in the Show & Enable panel on the View ribbon tab.

The Show Guides checkbox in the Grid & Guides panel on the Layout ribbon tab.

Either:
Clear the checkbox to hide the guides.
Select the checkbox to show the guides.
The guides disappear or appear against your checkbox setting.
When on, the guides are visible on the document pages where they have been added but only when editing the document. They are not printed and are absent when viewing the document in the Canvas Envision Web Viewer.
Adding guides to pages
To add a horizontal guide:
Click anywhere on the top ruler. The cursor becomes a vertical double-headed black arrow.

Drag the cursor down onto the page layout area. A horizontal guide is under the cursor.

Continue dragging the cursor down and up on the page layout area until you position the guide where you want it to be and release the mouse button. The horizontal guide is added to the page.
To add a vertical guide:
Click anywhere on the left ruler. The cursor becomes a horizontal double-headed black arrow.

Drag the cursor right onto the page layout area. A vertical guide is under the cursor.

Continue dragging the cursor right and left on the page layout area until you position the guide where you want it to be and release the mouse button. The vertical guide is added to the page.
The guides you added to the page are not automatically displayed on other pages. The pasteboard and page layout area display the guides placed on the current page. Navigating the pages updates the guides accordingly.
Moving guides on pages
To move a horizontal guide on a page:
Ensure the Select tool is on: the cursor should be a single-headed black arrow.
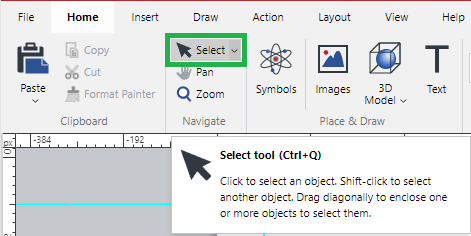
Click anywhere on the horizontal guide you want to move. The cursor becomes a vertical double-headed black arrow.
Drag the cursor down and up on the page layout area until you move the guide to the new position you want it to be and release the mouse button. The horizontal guide is repositioned on the page.
To move a vertical guide on a page:
Ensure the Select tool is on: the cursor should be a single-headed black arrow.
Click anywhere on the vertical guide you want to move. The cursor becomes a horizontal double-headed black arrow.
Drag the cursor right and left on the page layout area until you move the guide to the new position you want it to be and release the mouse button. The vertical guide is repositioned on the page.
Deleting guides from pages
To delete a horizontal guide from a page:
Ensure the Select tool is on: the cursor should be a single-headed black arrow.
Click anywhere on the horizontal guide you want to delete. The cursor becomes a vertical double-headed black arrow.
Drag the cursor onto the top ruler and release the mouse button. The horizontal guide is deleted from the page.
To delete a vertical guide from a page:
Ensure the Select tool is on: the cursor should be a single-headed black arrow.
Click anywhere on the vertical guide you want to delete. The cursor becomes a horizontal double-headed black arrow.
Drag the cursor onto the left ruler and release the mouse button. The vertical guide is deleted from the page.
Editing guides
To edit a guide:
Double-click the guide you want to edit. The Edit Guide dialog pops up.
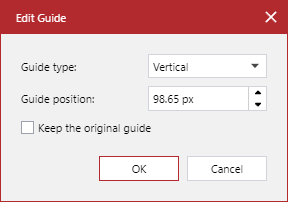
If necessary, change the type of the guide from the Guide type drop-down list, either:
Vertical
Horizontal
If necessary, enter the precise position of the guide in the Guide position field.
Keep the Keep the original guide checkbox cleared.
Click the OK button.
Creating precise guides
To create a guide at a precise position:
Double-click an existing guide. The Edit Guide dialog pops up.
Set the type of the new guide from the Guide type drop-down list, either:
Vertical
Horizontal
Enter the precise position of the new guide in the Guide position field.
Select the Keep the original guide checkbox.
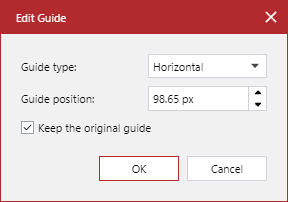
Click the OK button.
Snap to Guides feature
The Creator can assist you in aligning objects in the illustration with the Snap to Guides feature. To learn how to use it, refer to the Snapping Objects to Guides section.
Guides Layer
By default, the guides are on top of the objects on the page.
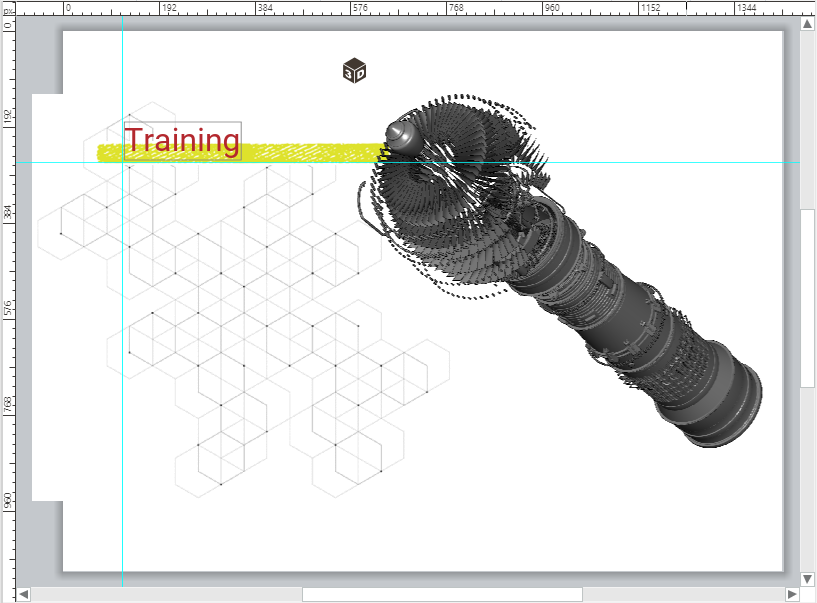
You can move the guides below or on top of the layers of a given page by moving down or up the Guides Layer in the Page# pop-up dialog. To learn how to call this dialog, see Layer controls.
Configuring guides
To configure the properties of guides:
Click the Set Up Grid & Guides button in the Grid & Guides panel on the Layout ribbon tab.

The Grid & Guides Options dialog pops up.
In the Guide setting pane of the Grid & Guides Options pop-up dialog, set the values as you need.

When you are done, click the OK button.
Guide properties
The Guide setting pane of the Grid & Guides Options pop-up dialog provides the following properties of guides for configuration:
Show guides: to show or hide guides.
Snap objects to guides: to enable or disable snapping objects to the guides.
Guideline color: a color of the guidelines.
Snap distance: a distance from the guidelines approaching which an object is snapped to the guidelines.
Scroll bars
The main working area includes the horizontal and vertical scroll bars on the bottom and right to scroll the pasteboard and page layout area on the screen in the horizontal and vertical dimensions to see the objects off the screen.
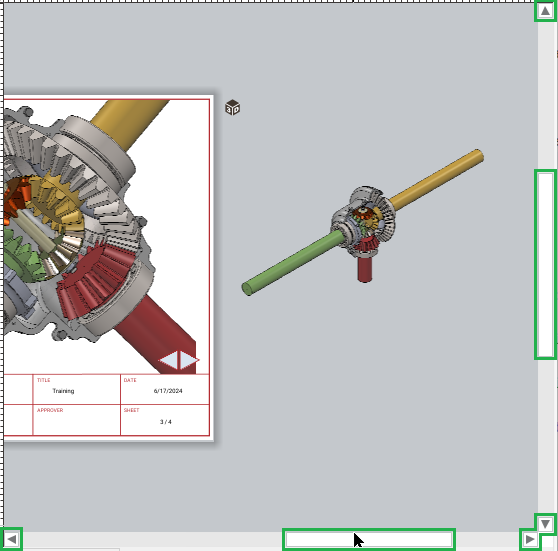
To scroll the pasteboard and page layout area with the scroll bars, either:
Drag the thumb:
Left and right on the bottom scroll bar to move the pasteboard and page layout area accordingly.
Up and down on the right scroll bar to move the pasteboard and page layout area accordingly.
Click the scroll bar arrow buttons to move the pasteboard and page layout area in the button direction.
Panning and zooming the page layout area or pasteboard automatically updates the scroll bars to display the current screen position.
The scrollbars are always visible and available.
Layer controls
A layer is a container for objects on a page. You can think of it as a piece of transparent film. Technically, you insert, position, edit, and delete objects on a layer and add, manage, and delete layers on the page.
A page must have at least one layer where you place your custom objects. One layer can have no, one, or more than one object. Multiple layers of objects can produce a layered illustration or different variants of the illustration. The layers are piled in a stack on the page. A higher layer is on top of a lower one.
The grid and guides have their layers. By default, the Grids Layer is the lowest, and the Guides Layer is the uppermost.
Layer controls bar
To navigate and manage the page layers, there is a bar with the layer controls under the bottom scroll bar.

This bar provides the following layer controls:
The layer tab:
To go to a given layer on the current page.
To access the layer menu.
The Add Layer button to raise the Add New Layer pop-up dialog to add a new layer to the current page.
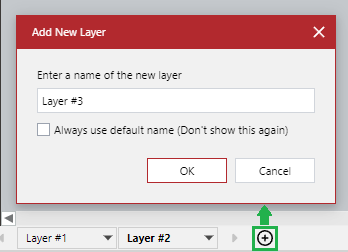
The layer controls bar is always visible and displays the layer tabs for the layers on the current page. Navigating the document pages updates the layer tabs accordingly.
Selecting layer
The layer tabs are for navigating the layers on the current page. Each layer for custom objects has its layer tab on the bar. The Grids Layer and Guides Layer have no layer tabs.
To work with objects on a layer, you should select this layer. By default, objects on unselected layers cannot be selected.
To select a layer:
Click the tab of this layer on the layer controls bar. The name of the layer becomes bold on the tab: the layer is currently selected. The names of the unselected layers are in the normal font.

Only one layer can be selected at the same time.
Layer tab menu
A layer tab has a menu button, which is a down-headed black triangle on the tab right.
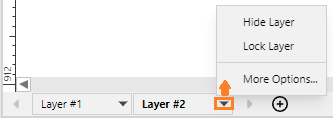
Clicking this button displays the layer menu for a given layer with the following actions:
Hide Layer: to hide the given layer from the page. When the layer is hidden, the objects on this layer are present in the page layout area but are not visible. This action is visible only for visible layers. A visible layer has its name in a dark color on the layer tab.
Show Layer: to show the given layer on the page. This action is visible only for hidden layers. A hidden layer has its name in a faded color on the layer tab.
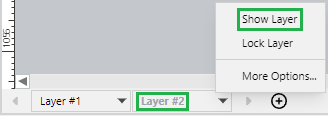
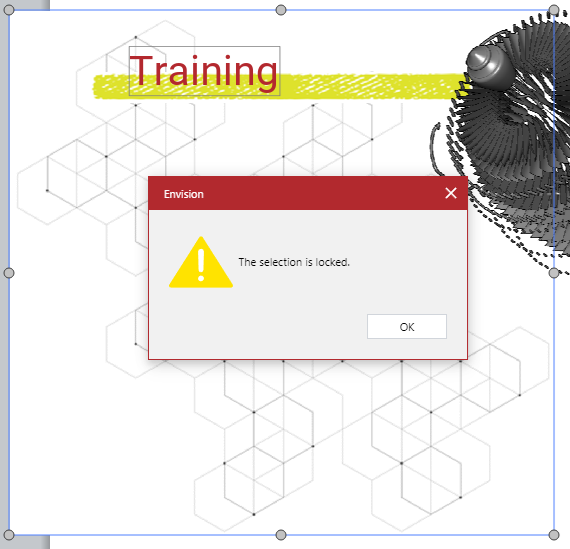
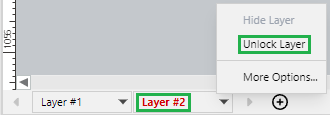
Lock Layer: to forbid editing the given layer. When the layer is locked, inserting new objects and editing the existing objects on this layer is not allowed. This action is visible only for unlocked layers. An unlocked layer has its name in black on the layer tab. Editing a locked layer raises a pop-up dialog with a message that the selection is locked.
Unlock Layer: to allow editing of the given layer. This action is visible only for locked layers. A locked layer has its name in red on the layer tab.
More Options: to raise the Page# pop-up dialog where you can manage the page layers, including the Grids Layer and Guides Layer.
Short video tutorial on layers
Zooming main working area
When some objects on the page layout area and pasteboard are too small or too large for viewing and working, you should adjust their visible size by increasing or decreasing the visible size of the page layout area and pasteboard on the screen with either:
The zoom controls.
The wheel mouse button.
Location of zoom controls
The zoom controls are located at the following places:
The Navigate panel on the Home ribbon tab.
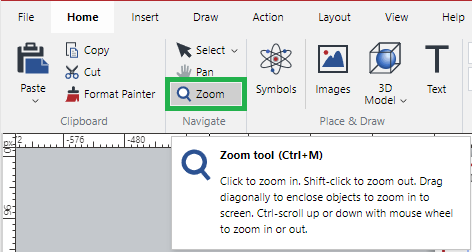
The Navigate panel on the Draw ribbon tab.
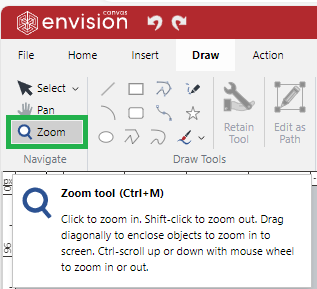
The Set Zoom Options panel on the View ribbon tab.

The right side of the Status bar.

Zoom tool
To turn the Zoom tool on, either:
Click the Zoom button at any place where it is available.
Press the Ctrl+M key combination.
When the Zoom tool is on:
The Zoom button is selected
The cursor is a spyglass.

Zooming with Zoom tool
To zoom in the area near the cursor when the Zoom tool is on:
Click.
In the zoom-in tool mode, the spyglass displays a plus.
To zoom out the area near the cursor when the Zoom tool is on:
Press the Shift key and click.
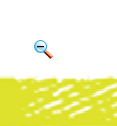
In the zoom-out tool mode, the spyglass displays a minus.
Zooming with mouse
You can zoom the page layout area and pasteboard with the mouse when the Zoom tool is off or on.
To quickly zoom in or out with the wheel mouse button:
Press the Ctrl key and rotate the wheel mouse button.
Restoring the default zoom
By default, the page layout area fits the visible screen.
To quickly restore the fit-to-window zoom and screen position of the page layout area:
Press the F3 key.
Short video tutorial on zoom
Navigating main working area
When the visible size of the page layout area and pasteboard is larger than the main working area, some of their parts are off the screen. To view the off-the-screen objects, you should scroll or pan the layout area and pasteboard with either:
The scroll bars as discussed in Scroll bars.
The Pan tool.
The wheel mouse button.
Location of Pan tool
The Pan button is located at the following places:
The Navigate panel on the Home ribbon tab.
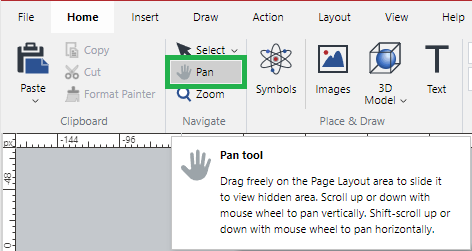
The Navigate panel on the Draw ribbon tab.
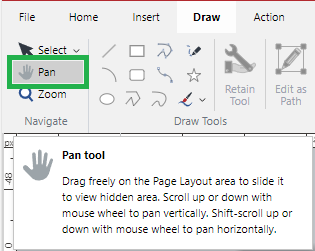
The right side of the Status bar.

Pan tool
To turn the Pan tool on:
Click the Pan button at any place where it is available.
When the Pan tool is on:
The Pan button is selected
The cursor is a hand.

Scrolling with Pan tool
To scroll the page layout area and pasteboard in a horizontal or vertical direction when the Pan tool is on:
Click and drag in that direction.
Scrolling with mouse
To quickly scroll the page layout area in the necessary direction with the wheel mouse button when the Pan tool is off or on:
Horizontally: press the Shift key and rotate the wheel mouse button.
Vertically: rotate the wheel mouse button.
Restoring the default screen position
To quickly restore the fit-to-window zoom and screen position of the page layout area:
Press the F3 key.